This code example belongs to the Eclipse RCP tutorial series.
Eclipse GEF (Graphical Editing Framework) contains three components: Draw2d (org.eclipse.draw2d), GEF (MVC) (org.eclipse.gef), and Zest (org.eclipse.zest). This tutorial is about GEF MVC.
A little bit about GEF MVC
The key insight of GEF is its MVC design. In brief, View is the appearance and Model stores the data to show. The following diagram shows the relation between Model, View and Controller. EditPart plays the role of Controller. What it does is getting data from a Model and them show it appropriately as a figure.

* This diagram is from www.eclipse.org/gef/reference/GEF%20Tutorial%202005.ppt – a must-read tutorial for GEF design.
Goal of this application
Eclipse GEF is not new, so I found a lot of tutorials about Eclipse GEF. Some of them are too simple and only talks about adding some figures. Others talk about making an editor. What I want to do is to add some figures to a view (not an editor), and connect those figures.
In this tutorial, I will create some shapes and add connections between them. Finally, it looks like the following:
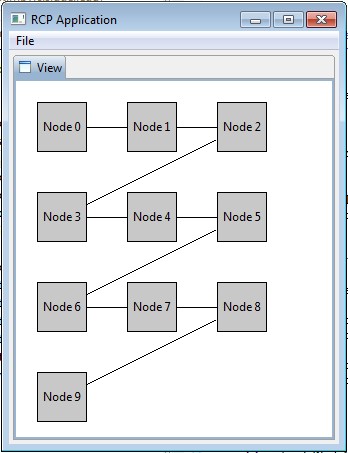
Now, let’s start.
Step 1: Create a Plug-in Project
Create a plugin project named “GEFTutorial” and then use wizard to add a view. If you don’t know how to do this, here is how to create a plug-in with a view.
This view will be changed to contain our figures that will be created below.
Step 2: Create Models
Models store data about shapes. There are 3 different models in this example – root model, node model, and connection model.
Root model is the root or container for other models. As the following code shown, it can create some node models and connections between them.
package gefmvc; import java.util.ArrayList; import java.util.List; public class Model { private List<NodeModel> nodes; public Model() { nodes = new ArrayList<NodeModel>(); for (int i = 0; i < 10; i++) { NodeModel node = new NodeModel("Node " + i ); nodes.add(node); } //set the connection here for (int i = 0; i < 10 - 1; i++) { NodeConnectionModel connection = new NodeConnectionModel(); connection.setSource((NodeModel) nodes.get(i)); connection.setTarget((NodeModel) nodes.get(i + 1)); ((NodeModel) nodes.get(i)).addSourceConnection(connection); ((NodeModel) nodes.get(i + 1)).addTargetConnection(connection); } } public List<NodeModel> getNodes() { return nodes; } } |
Node Model corresponds to a figure or shape in an GEF application. It stores the properties required, such as label, size, positions, etc.
package gefmvc; import java.util.ArrayList; import java.util.List; public class NodeModel { private List<NodeConnectionModel> sourceConnections = new ArrayList<NodeConnectionModel>(); private List<NodeConnectionModel> targetConnections = new ArrayList<NodeConnectionModel>(); public NodeModel(String s) { label = s; } public String getLabel() { return label; } private final String label; public List<NodeConnectionModel> getSourceConnections() { return sourceConnections; } public List<NodeConnectionModel> getTargetConnections() { return targetConnections; } public void addSourceConnection(NodeConnectionModel iConnection) { sourceConnections.add(iConnection); } public void addTargetConnection(NodeConnectionModel iConnection) { targetConnections.add(iConnection); } } |
Connection Model corresponds to the connection links.
package gefmvc; /** * This class is the model for connections between AnodeModel objects. */ public class NodeConnectionModel { private NodeModel source; private NodeModel target; public void setSource(NodeModel s) { source = s; } public void setTarget(NodeModel t) { target = t; } } |
Step 3: Create View and Controller
There are 3 types of EditPart in this example. The first is the ‘root’ EditPart which holds the root element of the model. It is responsible for the root model. The other two are true ‘controller’ EditParts, each responsible for controlling a specific model(NodeModel or ConnectionModel).
TopEditPart
package gefmvc; import java.util.List; import org.eclipse.draw2d.Figure; import org.eclipse.draw2d.FreeformLayer; import org.eclipse.draw2d.FreeformLayout; import org.eclipse.draw2d.GridLayout; import org.eclipse.draw2d.IFigure; import org.eclipse.draw2d.MarginBorder; import org.eclipse.gef.editparts.AbstractGraphicalEditPart; public class TopEditPart extends AbstractGraphicalEditPart { protected IFigure createFigure() { Figure f = new FreeformLayer(); f.setLayoutManager(new FreeformLayout()); f.setBorder(new MarginBorder(1)); // Create a layout for the graphical screen GridLayout gridLayout = new GridLayout(); gridLayout.numColumns = 3; gridLayout.horizontalSpacing = 40; gridLayout.verticalSpacing = 40; gridLayout.marginHeight = 20; gridLayout.marginWidth = 20; f.setLayoutManager(gridLayout); f.setOpaque(true); return f; } protected void createEditPolicies() { } protected List<NodeModel> getModelChildren() { List<NodeModel> children = ((Model) getModel()).getNodes(); return children; } } |
AnodeEditPart
package gefmvc; import java.beans.PropertyChangeEvent; import java.util.List; import org.eclipse.draw2d.ChopboxAnchor; import org.eclipse.draw2d.IFigure; import org.eclipse.draw2d.Label; import org.eclipse.draw2d.PositionConstants; import org.eclipse.draw2d.RectangleFigure; import org.eclipse.draw2d.geometry.Rectangle; import org.eclipse.gef.ConnectionEditPart; import org.eclipse.gef.editparts.AbstractGraphicalEditPart; import org.eclipse.swt.graphics.Color; public class AnodeEditPart extends AbstractGraphicalEditPart { /** The figure's anchor. */ private ChopboxAnchor m_anchor; protected IFigure createFigure() { System.out.println("Called HelloEditPart.createFigure()"); IFigure rectangle = new RectangleFigure(); rectangle.setBackgroundColor(new Color(null, 200, 200, 200)); m_anchor = new ChopboxAnchor(rectangle); return rectangle; } protected void createEditPolicies() { System.out.println("Called HelloEditPart.createEditPolicies()"); } protected void refreshVisuals() { NodeModel node = (NodeModel)getModel(); //This is where the actual drawing is done, // Simply a rectangle with text Rectangle bounds = new Rectangle(50, 50, 50, 50); getFigure().setBounds(bounds); Label label = new Label(node.getLabel()); label.setTextAlignment(PositionConstants.CENTER); label.setBounds(bounds.crop(IFigure.NO_INSETS)); getFigure().add(label); } public void propertyChange(PropertyChangeEvent evt) { } protected List getModelSourceConnections() { List sourceConnections = ((NodeModel) getModel()).getSourceConnections(); return sourceConnections; } protected List getModelTargetConnections() { List targetConnection = ((NodeModel) getModel()).getTargetConnections(); return targetConnection; } protected ConnectionEditPart createConnection(Object iModel) { NodeConnectionEditPart connectPart = (NodeConnectionEditPart) getRoot() .getViewer().getEditPartRegistry().get(iModel); if (connectPart == null) { connectPart = new NodeConnectionEditPart(); connectPart.setModel(iModel); } return connectPart; } } |
NodeConnectionEditPart
package gefmvc; import org.eclipse.gef.editparts.AbstractConnectionEditPart; public class NodeConnectionEditPart extends AbstractConnectionEditPart{ protected void createEditPolicies() { } } |
GraphicalPartFactory is the factory for producing different EditPart. (It is a typical factory design pattern).
package gefmvc; import org.eclipse.gef.EditPart; import org.eclipse.gef.EditPartFactory; public class GraphicalPartFactory implements EditPartFactory { public EditPart createEditPart(EditPart iContext, Object iModel) { System.out.println("Called GraphicalPartFactory.createEditPart(" + iContext + "," + iModel + ")"); EditPart editPart = null; if (iModel instanceof Model) { editPart = new TopEditPart(); } else if (iModel instanceof NodeModel) { editPart = new AnodeEditPart(); } if (editPart != null) { editPart.setModel(iModel); } return editPart; } } |
Step 4: Add to the View
In the very first step, we created a view. Now the shapes and connections can be added to the view.
package geftutorial; import org.eclipse.gef.EditPartFactory; import org.eclipse.gef.RootEditPart; import org.eclipse.gef.editparts.FreeformGraphicalRootEditPart; import org.eclipse.gef.ui.parts.ScrollingGraphicalViewer; import org.eclipse.swt.graphics.Color; import org.eclipse.swt.widgets.Composite; import org.eclipse.ui.part.ViewPart; import gefmvc.*; public class View extends ViewPart { public static final String ID = "GEFTutorial.view"; // Use a standard Viewer for the Draw2d canvas private ScrollingGraphicalViewer viewer = new ScrollingGraphicalViewer(); // Use standard RootEditPart as holder for all other edit parts private RootEditPart rootEditPart = new FreeformGraphicalRootEditPart(); // Custom made EditPartFactory, will automatically be called to create edit // parts for model elements private EditPartFactory editPartFactory = new GraphicalPartFactory(); // The model private Model model; /** * This is a callback that will allow us to create the viewer and initialize * it. */ public void createPartControl(Composite parent) { // Create a dummy model model = new Model(); // Initialize the viewer, 'parent' is the // enclosing RCP windowframe viewer.createControl(parent); viewer.setRootEditPart(rootEditPart); viewer.setEditPartFactory(editPartFactory); // Inject the model into the viewer, the viewer will // traverse the model automatically viewer.setContents(model); // Set the view's background to white viewer.getControl().setBackground(new Color(null, 255, 255, 255)); } /** * Passing the focus request to the viewer's control. */ public void setFocus() { viewer.getControl().setFocus(); } } |
The final project in your Project Explorer view should looks like the following:

References:
1. A brief doc: http://wiki.eclipse.org/GEF_Description
2. GEF interactions: http://www.eclipse.org/gef/reference/interactions.html
Hi,
I am reading an xml file and creating this diagram in GEF in a view…I also have bendpoints for a transition.
In AnodeEditPart class createconnection method, i get the connectionfigure everytime and add points to it .But when the diagram appears it doesn’t create any bendpoints.
Also in my NodeConnectionEditPart i have installed editbendpoint policy without implementing any of the commands.
I don’t want to write any commands since my diagram is not editable.i just want to read points from xml and display it in the diagram..Can you please let me know how to draw bendpoints at the start of diagram without manually dragging a connection and creating.
Regards,
Anudeep.
好,没问题,我现在的首页sidebar是手动的,所以è¦æ‰‹åŠ¨æ‰èƒ½åŠ 进去。
多谢å‹é“¾ï¼å¦‚果在首页也å¯ä»¥çœ‹åˆ°å°±æ›´å¥½äº†ï¼å¯ä»¥å¸®åŠ©å¢žåŠ 俺的å°ç«™çš„æœç´¢å¼•æ“ŽæŽ’å:P