This is the code for In silico labeling: Predicting fluorescent labels in unlabeled images. It is the result of a collaboration between Google Accelerated Science and two external labs: the Lee Rubin lab at Harvard and the Steven Finkbeiner lab at Gladstone. See also our blog post and our full dataset, including many predictions we couldn't fit in the paper.
This code in this repository can be used to run training and inference of our model on a single machine, and can be adapted for distributed training. It also contains a set of weights created by training the model on the data in Conditions A, B, C, and D from the paper.
This README will explain how to:
Please note, the example in this README deviates from the way transfer learning is demonstrated in the paper. In the paper, the model is trained once on all datasets, including Condition E; this is also called multi-task learning. In this guide, we're starting with a pre-trained model on Conditions A, B, C, and D, and incrementally training it on Condition E. The benefit of the latter technique is it requires less time to learn a new task, but it is likely to overfit if overtrained (see below).
The model here differs from the model described in the paper in one significant way: this model does an initial linear projection to 16 features per pixel, where the model in the paper does not have this step. This allows the model to take as input z-stacks with varying numbers of z depths; the only thing that needs to be relearned is the initial linear projection. Here, we'll use it to take full advantage of the 26 z depths in Condition E (the other conditions have 13 z depths).
You can also find the complete set of preprocessed data used for the paper, along with predictions, here.
This is not an official Google product.
This code exists primarily to let readers reproduce some of the results in the Cell paper. We welcome pull requests, but sadly don't have the time to make improvements ourselves. If you want an easy-to-use, state-of-the-art, image-to-image predictor for your microscopy problem, you should probably look elsewhere.
This code does CPU fine-tuning on a single machine, while for the paper we used a distributed system consisting of many CPU workers. It would take a long time to train from scratch on a single workstation, and in any case training on CPUs is a much worse option now that it used to be - for a network like this it would make more sense to train on a GPU or TPU.
The code requires Python 3 and depends on NumPy, TensorFlow, and OpenCV. You can
install TensorFlow using this guide,
which will also install NumPy. If you follow that guide you will have installed
pip3 and you'll be able to install OpenCV with the command: pip3 install --upgrade opencv-python.
We're using Bazel to build the code and run tests. Though not strictly necessary, we suggest you install it (the rest of this README will assume you have it).
This code has been tested in Debian 10 with TensorFlow 1.9 on a machine with 64 GB RAM.
It is not optimized for memory use, and has been reported to fail with a Python MemoryError on a machine with 16 GB RAM.
Based on tests with ulimit, you may be able to squeak by with 32 GB RAM, but some users have reported needing 64 GB.
We'll work with the data sample in data_sample.zip
(Warning: 2 GB download) and a checkpoint from the pre-trained model
in checkpoints.zip. If
you have gsutil installed, you can also use the commands:
gsutil -m cp gs://in-silico-labeling/checkpoints.zip .
gsutil -m cp gs://in-silico-labeling/data_sample.zip .
The rest of this README will assume you've downloaded and extracted these
archives to checkpoints/ and data_sample/.
Training and inference are controlled by the script isl/launch.py. We recommend
you invoke the script with Bazel (see below), because it will handle dependency
management for you.
The checkpoints.zip file contains parameters from a model trained on
Conditions A, B, C, and D. To run the model on a sample from Condition B, run
this command from the project root:
export BASE_DIRECTORY=/tmp/isl
bazel run isl:launch -- \
  --alsologtostderr \
  --base_directory $BASE_DIRECTORY \
  --mode EVAL_EVAL \
  --metric INFER_FULL \
  --stitch_crop_size 1500 \
  --restore_directory $(pwd)/checkpoints \
  --read_pngs \
  --dataset_eval_directory $(pwd)/data_sample/condition_b_sample \
  --infer_channel_whitelist DAPI_CONFOCAL,MAP2_CONFOCAL,NFH_CONFOCAL
If you get a syntax error, make sure you're using Python 3, not Python 2.
In the above:
BASE_DIRECTORY is the working directory for the model. It will be created
if it doesn't already exist, and it's where the model predictions will be
written. You can set it to whatever you want.alsologtostderr will cause progress information to be printed to the
terminal.stitch_crop_size is the size of the crop for which we'll perform
inference. If set to 1500 it may take an hour on a single machine, so try
smaller numbers first.infer_channel_whitelist is the list of fluorescence channels we wish to
infer. For the Condition B data, this should be a subset of DAPI_CONFOCAL,
MAP2_CONFOCAL, and NFH_CONFOCAL.If you run this command, you should get a target_error_panel.png that looks
like this:
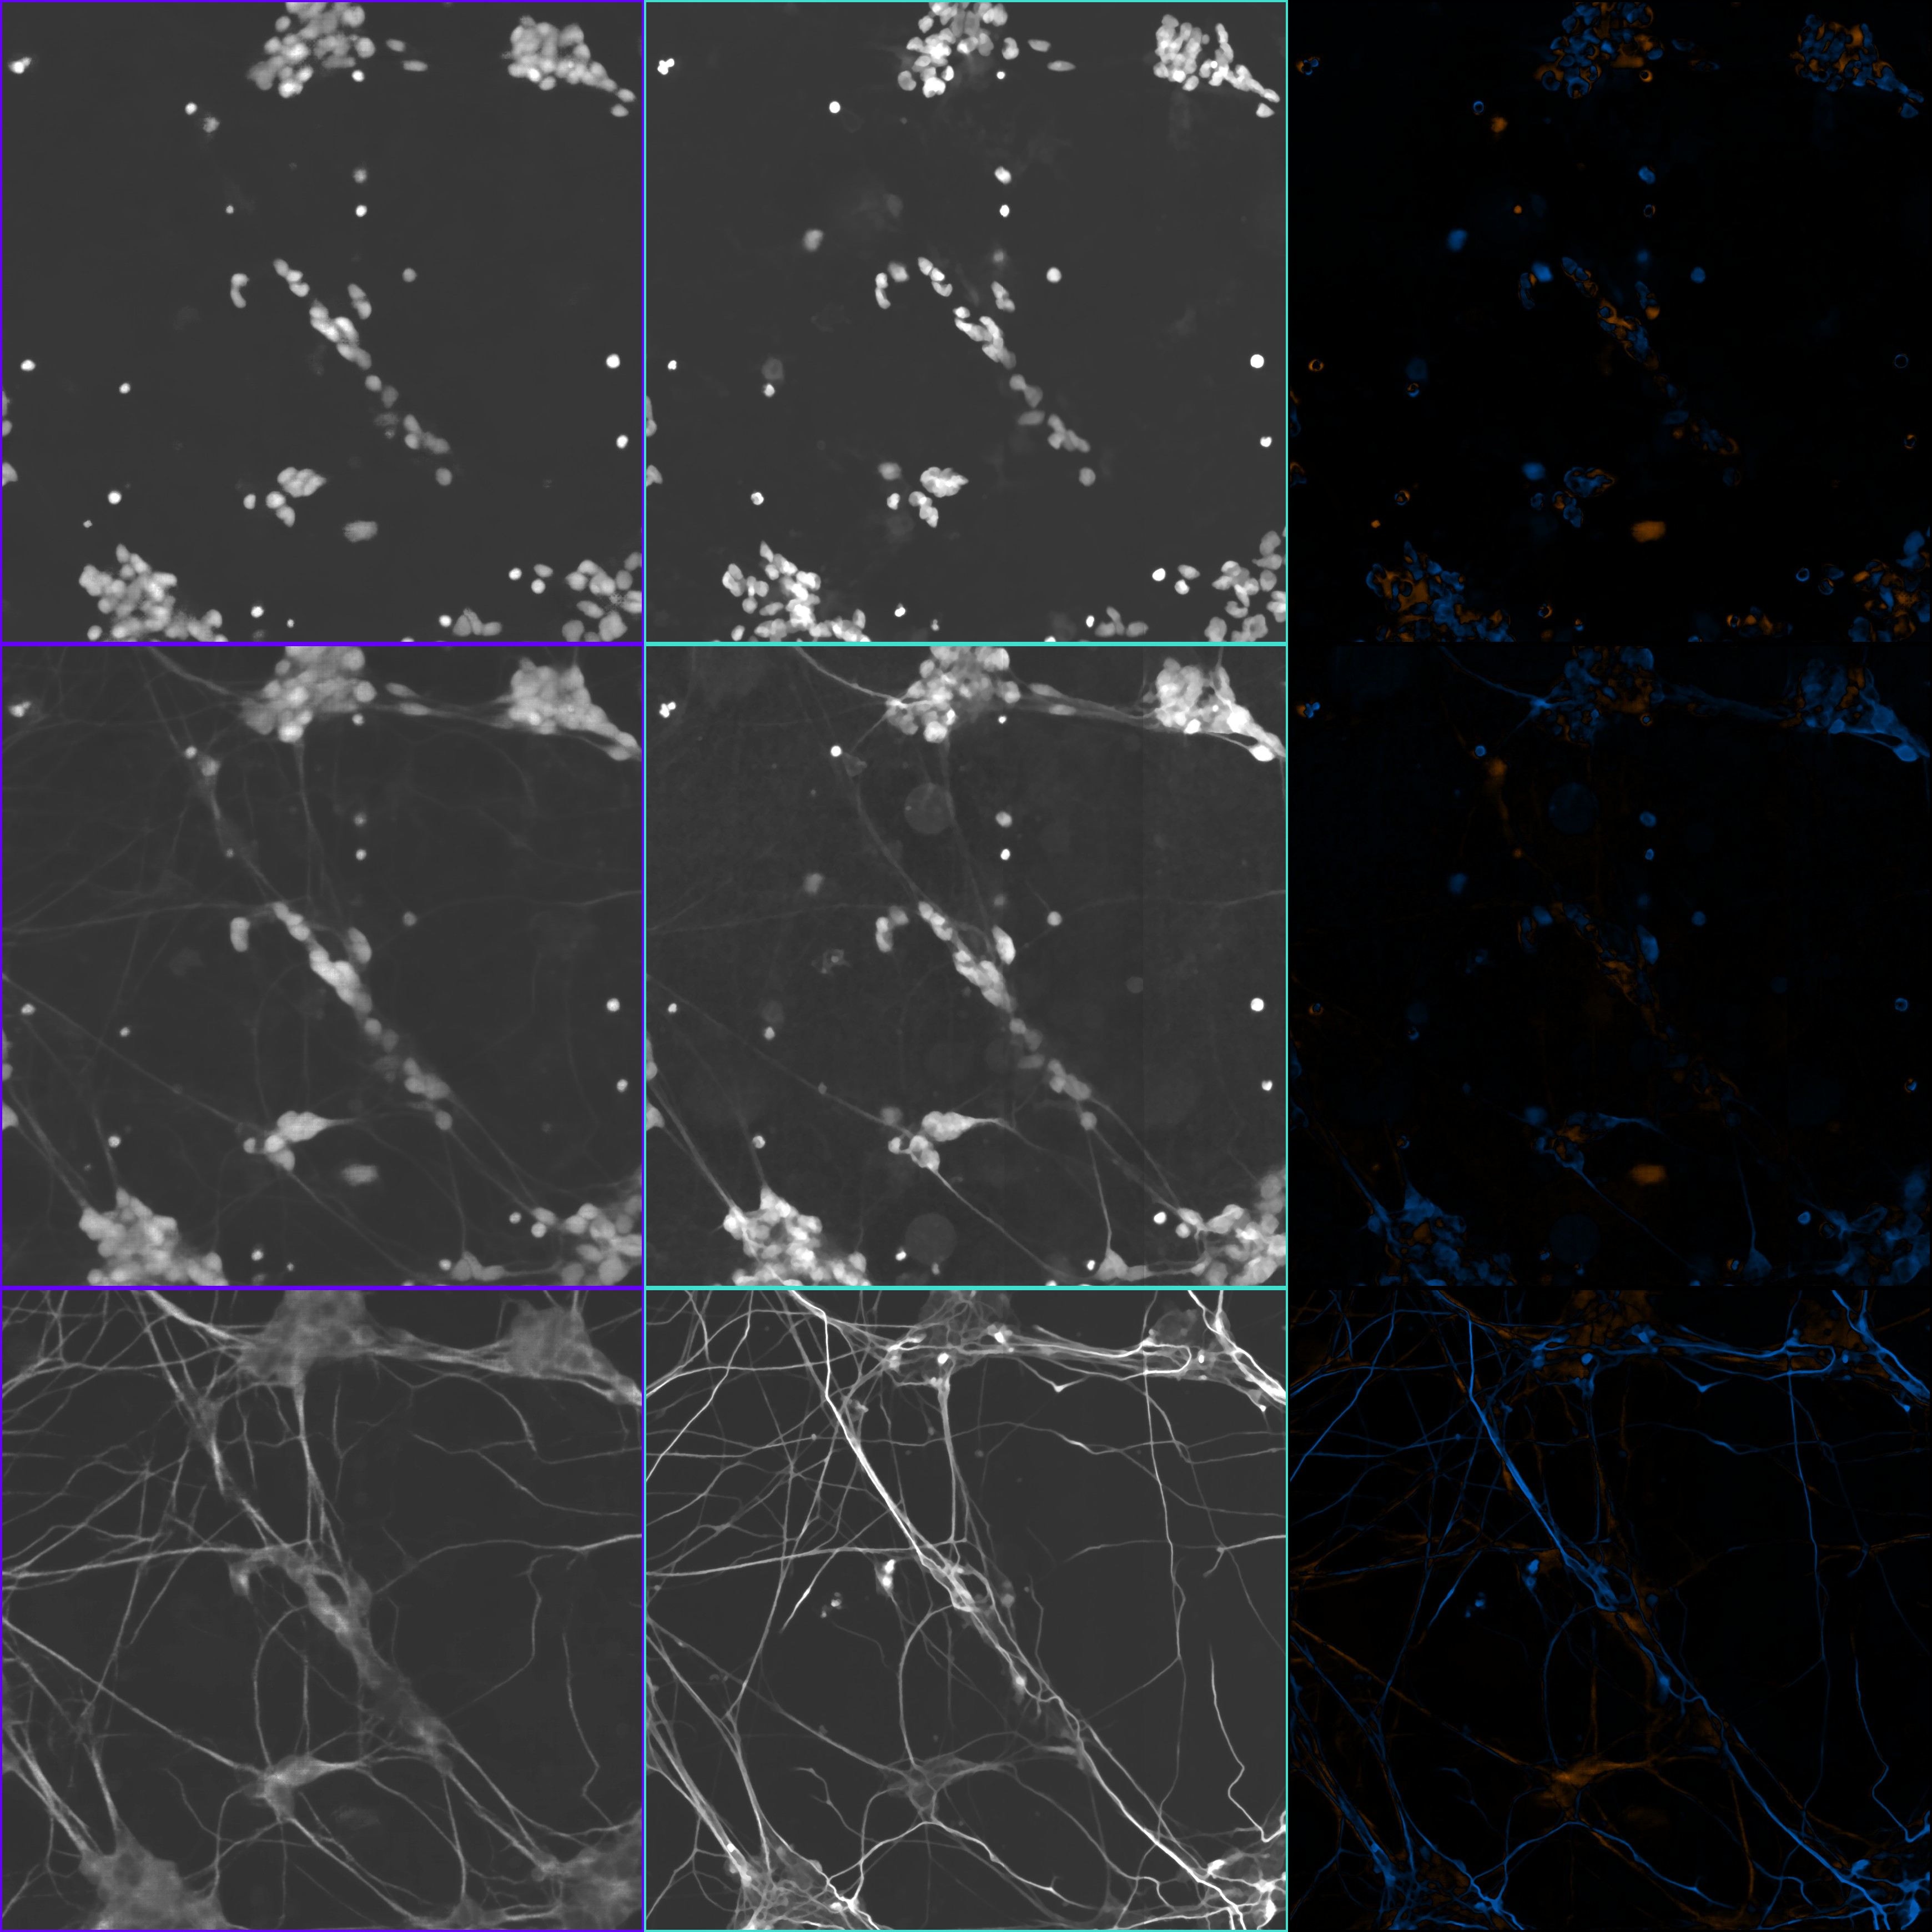
Each row is one of the whitelisted channels you provided; in this case it's one
row for each of the DAPI_CONFOCAL, MAP2_CONFOCAL, and NFH_CONFOCAL channels. The boxes with the
purple borders show the predicted images (in this case the medians of the
per-pixel distributions). The boxes with the teal borders show the true
fluorescence images. The boxes with the black borders show errors, with false
positives in orange and false negatives in blue.
The script will also generate a file called input_error_panel.png, which shows
the 26 transmitted light input images along with auto-encoding predictions and
errors. For this condition, there were only 13 z-depths, so this visualization
will show each z-depth twice.
Condition E contains a cell type not previously seen by the model (human cancer cells), imaged with a transmitted light modality not previously seen (DIC), and labeled with a marker not previously seen (CellMask). We have two wells in our sample data (B2 and B3), so let's use B2 for training and B3 for evaluation.
To see how well the model can predict labels on the evaluation dataset before training, run:
export BASE_DIRECTORY=/tmp/isl
bazel run isl:launch -- \
  --alsologtostderr \
  --base_directory $BASE_DIRECTORY \
  --mode EVAL_EVAL \
  --metric INFER_FULL \
  --stitch_crop_size 1500 \
  --restore_directory $(pwd)/checkpoints \
  --read_pngs \
  --dataset_eval_directory $(pwd)/data_sample/condition_e_sample_B3 \
  --infer_channel_whitelist DAPI_CONFOCAL,CELLMASK_CONFOCAL \
  --noinfer_simplify_error_panels
This should produce this target error panel:

This is like the error panels above, but the first row is DAPI_CONFOCAL and the second is CELLMASK_CONFOCAL.
And because we used noinfer_simplify_error_panels it includes more statistics of the
pixel distribution. Previously, there was one purple-bordered box which showed the
medians of the pixel distributions. Now there are four purple-bordered boxes which show,
in order, the mode, median, mean, and standard deviation. There are now three
boxes with black borders, showing the same error visualization as before, but
for the mode and mean as well as the median. The white-bordered boxes are a new
kind of error visualization, in which colors on the grayline between black and
white correspond to correct predictions, orange corresponds to a false positive,
and blue corresponds to a false negative. The final mango-bordered box is not
informative for this exercise.
The pre-trained model hasn't seen the Condition E dataset, so we should expect its predictions to be poor. Note, however, there is some transfer of the nuclear label even before training.
You can find the input images, consisting of a z-stack of 26 images, here (Warning: 100 MB download).
We can train the network on the Condition E data on a single machine using a command like:
export BASE_DIRECTORY=/tmp/isl
bazel run isl:launch -- \
  --alsologtostderr \
  --base_directory $BASE_DIRECTORY \
  --mode TRAIN \
  --metric LOSS \
  --master "" \
  --restore_directory $(pwd)/checkpoints \
  --read_pngs \
  --dataset_train_directory $(pwd)/data_sample/condition_e_sample_B2
By default, this uses the ADAM optimizer with a learning rate of 1e-4. If you
wish to visualize training progress, you can run
TensorBoard on BASE_DIRECTORY:
tensorboard --logdir $BASE_DIRECTORYYou should eventually see a training curve that looks like this:
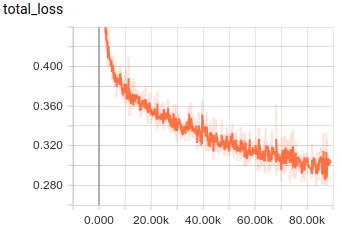
After 50,000 steps, which takes about a week on a 32-core machine, predictions on the eval data should have substantially improved. You can run this command to generate predictions:
export BASE_DIRECTORY=/tmp/isl
bazel run isl:launch -- \
  --alsologtostderr \
  --base_directory $BASE_DIRECTORY \
  --mode EVAL_EVAL \
  --metric INFER_FULL \
  --stitch_crop_size 1500 \
  --read_pngs \
  --dataset_eval_directory $(pwd)/data_sample/condition_e_sample_B3 \
  --infer_channel_whitelist DAPI_CONFOCAL,CELLMASK_CONFOCAL \
  --noinfer_simplify_error_panels
Note, we've dropped the restore_directory argument, so the model will run inference using the latest checkpoint it finds in BASE_DIRECTORY.
Here's what the predictions should look like on the evaluation data:

Note, there is a bug in the normalization of the DAPI_CONFOCAL channel causing
it to have a reduced dynamic range in the ground-truth image. Comparing the
initial nuclear predictions with these, it is clear the network learned to match
the reduced dynamic range.
For reference, here's what predictions should look like on the train data:

Note, if we train too long the model will eventually overfit on the train data and predictions will worsen. This was not an issue in the paper, because there we simultaneously trained on all tasks, so that each task regularized the others.
If you use this code, please cite our paper:
Christiansen E, Yang S, Ando D, Javaherian A, Skibinski G, Lipnick S, Mount E, O'Neil A, Shah K, Lee A, Goyal P, Fedus W, Poplin R, Esteva A, Berndl M, Rubin L, Nelson P, Finkbeiner S. In silico labeling: Predicting fluorescent labels in unlabeled images. Cell. 2018
BibTeX:
@article{christiansen2018isl,
  title={In silico labeling: Predicting fluorescent labels in unlabeled images},
  author={Christiansen, Eric M and Yang, Samuel J and Ando, D Michael and Javaherian, Ashkan and Skibinski, Gaia and Lipnick, Scott and Mount, Elliot and O’Neil, Alison and Shah, Kevan and Lee, Alicia K and Goyal, Piyush and Fedus, William and Poplin, Ryan and Esteva, Andre and Berndl, Marc and Rubin, Lee L and Nelson, Philip and Finkbeiner, Steven},
  journal={Cell},
  year={2018},
  publisher={Elsevier}
}DAPI_CONFOCAL normalization bug for the Condition E data. Note: This bug was introduced after
data was generated for the paper.