SECOND detector.
"Alpha" means there may be many bugs, config format may change, spconv API may change.
ONLY support python 3.6+, pytorch 1.0.0+. Tested in Ubuntu 16.04/18.04/Windows 10.
If you want to train nuscenes dataset, see this.
2019-4-1: SECOND V1.6.0alpha released: New Data API, NuScenes support, PointPillars support, fp16 and multi-gpu support.
2019-3-21: SECOND V1.5.1 (minor improvement and bug fix) released!
2019-1-20: SECOND V1.5 released! Sparse convolution-based network.
See release notes for more details.
WARNING: you should rerun info generation after every code update.
car.fhd.config + 160 epochs (25 fps in 1080Ti):
Car AP@0.70, 0.70, 0.70:
bbox AP:90.77, 89.50, 80.80
bev  AP:90.28, 87.73, 79.67
3d   AP:88.84, 78.43, 76.88
car.fhd.config + 50 epochs + super converge (6.5 hours) + (25 fps in 1080Ti):
Car AP@0.70, 0.70, 0.70:
bbox AP:90.78, 89.59, 88.42
bev  AP:90.12, 87.87, 86.77
3d   AP:88.62, 78.31, 76.62
car.fhd.onestage.config + 50 epochs + super converge (6.5 hours) + (25 fps in 1080Ti):
Car AP@0.70, 0.70, 0.70:
bbox AP:97.65, 89.59, 88.72
bev  AP:90.38, 88.20, 86.98
3d AP:89.16, 78.78, 77.41car Nusc dist AP@0.5, 1.0, 2.0, 4.0
62.90, 73.07, 76.77, 78.79
bicycle Nusc dist AP@0.5, 1.0, 2.0, 4.0
0.00, 0.00, 0.00, 0.00
bus Nusc dist AP@0.5, 1.0, 2.0, 4.0
9.53, 26.17, 38.01, 40.60
construction_vehicle Nusc dist AP@0.5, 1.0, 2.0, 4.0
0.00, 0.00, 0.44, 1.43
motorcycle Nusc dist AP@0.5, 1.0, 2.0, 4.0
9.25, 12.90, 13.69, 14.11
pedestrian Nusc dist AP@0.5, 1.0, 2.0, 4.0
61.44, 62.61, 64.09, 66.35
traffic_cone Nusc dist AP@0.5, 1.0, 2.0, 4.0
11.63, 13.14, 15.81, 21.22
trailer Nusc dist AP@0.5, 1.0, 2.0, 4.0
0.80, 9.90, 17.61, 23.26
truck Nusc dist AP@0.5, 1.0, 2.0, 4.0
9.81, 21.40, 27.55, 30.34git clone https://github.com/traveller59/second.pytorch.git
cd ./second.pytorch/secondIt is recommend to use Anaconda package manager.
conda install scikit-image scipy numba pillow matplotlibpip install fire tensorboardX protobuf opencv-pythonIf you don't have Anaconda:
pip install numba scikit-image scipy pillowFollow instructions in spconv to install spconv.
If you want to train with fp16 mixed precision (train faster in RTX series, Titan V/RTX and Tesla V100, but I only have 1080Ti), you need to install apex.
If you want to use NuScenes dataset, you need to install nuscenes-devkit.
you need to add following environment variable for numba.cuda, you can add them to ~/.bashrc:
export NUMBAPRO_CUDA_DRIVER=/usr/lib/x86_64-linux-gnu/libcuda.so
export NUMBAPRO_NVVM=/usr/local/cuda/nvvm/lib64/libnvvm.so
export NUMBAPRO_LIBDEVICE=/usr/local/cuda/nvvm/libdeviceDownload KITTI dataset and create some directories first:
└── KITTI_DATASET_ROOT
       ├── training    <-- 7481 train data
       |   ├── image_2 <-- for visualization
       |   ├── calib
       |   ├── label_2
       |   ├── velodyne
       |   └── velodyne_reduced <-- empty directory
       └── testing     <-- 7580 test data
           ├── image_2 <-- for visualization
           ├── calib
           ├── velodyne
           └── velodyne_reduced <-- empty directory
Then run
python create_data.py kitti_data_prep --data_path=KITTI_DATASET_ROOTDownload NuScenes dataset:
└── NUSCENES_TRAINVAL_DATASET_ROOT
       ├── samples       <-- key frames
       ├── sweeps        <-- frames without annotation
       ├── maps          <-- unused
       └── v1.0-trainval <-- metadata and annotations
└── NUSCENES_TEST_DATASET_ROOT
       ├── samples       <-- key frames
       ├── sweeps        <-- frames without annotation
       ├── maps          <-- unused
       └── v1.0-test     <-- metadata
Then run
python create_data.py nuscenes_data_prep --data_path=NUSCENES_TRAINVAL_DATASET_ROOT --version="v1.0-trainval" --max_sweeps=10
python create_data.py nuscenes_data_prep --data_path=NUSCENES_TEST_DATASET_ROOT --version="v1.0-test" --max_sweeps=10
--dataset_name="NuscenesDataset"
This will create gt database without velocity. to add velocity, use dataset name NuscenesDatasetVelo.
There is some path need to be configured in config file:
train_input_reader: {
  ...
  database_sampler {
    database_info_path: "/path/to/dataset_dbinfos_train.pkl"
    ...
  }
  dataset: {
    dataset_class_name: "DATASET_NAME"
    kitti_info_path: "/path/to/dataset_infos_train.pkl"
    kitti_root_path: "DATASET_ROOT"
  }
}
...
eval_input_reader: {
  ...
  dataset: {
    dataset_class_name: "DATASET_NAME"
    kitti_info_path: "/path/to/dataset_infos_val.pkl"
    kitti_root_path: "DATASET_ROOT"
  }
}I recommend to use script.py to train and eval. see script.py for more details.
python ./pytorch/train.py train --config_path=./configs/car.fhd.config --model_dir=/path/to/model_dirAssume you have 4 GPUs and want to train with 3 GPUs:
CUDA_VISIBLE_DEVICES=0,1,3 python ./pytorch/train.py train --config_path=./configs/car.fhd.config --model_dir=/path/to/model_dir --multi_gpu=TrueNote: The batch_size and num_workers in config file is per-GPU, if you use multi-gpu, they will be multiplied by number of GPUs. Don't modify them manually.
You need to modify total step in config file. For example, 50 epochs = 15500 steps for car.lite.config and single GPU, if you use 4 GPUs, you need to divide steps and steps_per_eval by 4.
Modify config file, set enable_mixed_precision to true.
Make sure "/path/to/model_dir" doesn't exist if you want to train new model. A new directory will be created if the model_dir doesn't exist, otherwise will read checkpoints in it.
training process use batchsize=6 as default for 1080Ti, you need to reduce batchsize if your GPU has less memory.
Currently only support single GPU training, but train a model only needs 20 hours (165 epoch) in a single 1080Ti and only needs 50 epoch to reach 78.3 AP with super converge in car moderate 3D in Kitti validation dateset.
python ./pytorch/train.py evaluate --config_path=./configs/car.fhd.config --model_dir=/path/to/model_dir --measure_time=True --batch_size=1You can download pretrained models in google drive. The car_fhd model is corresponding to car.fhd.config.
Note that this pretrained model is trained before a bug of sparse convolution fixed, so the eval result may slightly worse.
You can use a prebuilt docker for testing:
docker pull scrin/second-pytorch Then run:
nvidia-docker run -it --rm -v /media/yy/960evo/datasets/:/root/data -v $HOME/pretrained_models:/root/model --ipc=host second-pytorch:latest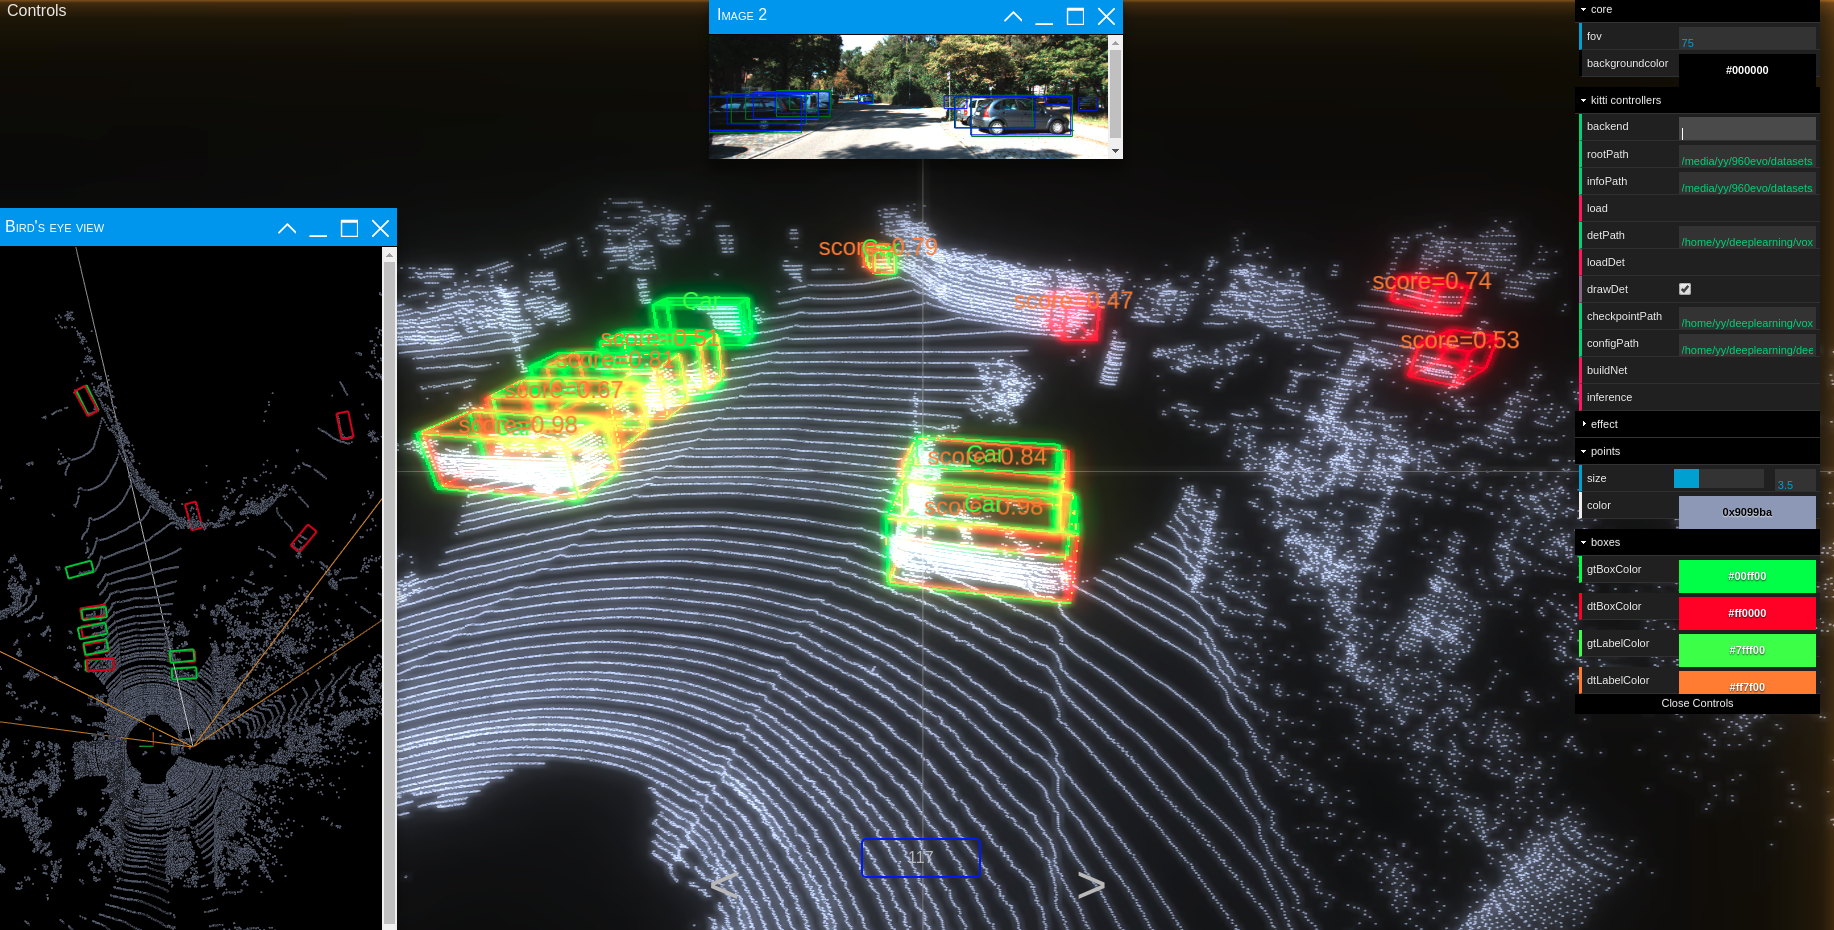
python ./pytorch/train.py evaluate --config_path=./configs/car.config --model_dir=/root/model/carrun python ./kittiviewer/backend/main.py main --port=xxxx in your server/local.
run cd ./kittiviewer/frontend && python -m http.server to launch a local web server.
open your browser and enter your frontend url (e.g. http://127.0.0.1:8000, default]).
input backend url (e.g. http://127.0.0.1:16666)
input root path, info path and det path (optional)
click load, loadDet (optional), input image index in center bottom of screen and press Enter.
Firstly the load button must be clicked and load successfully.
input checkpointPath and configPath.
click buildNet.
click inference.
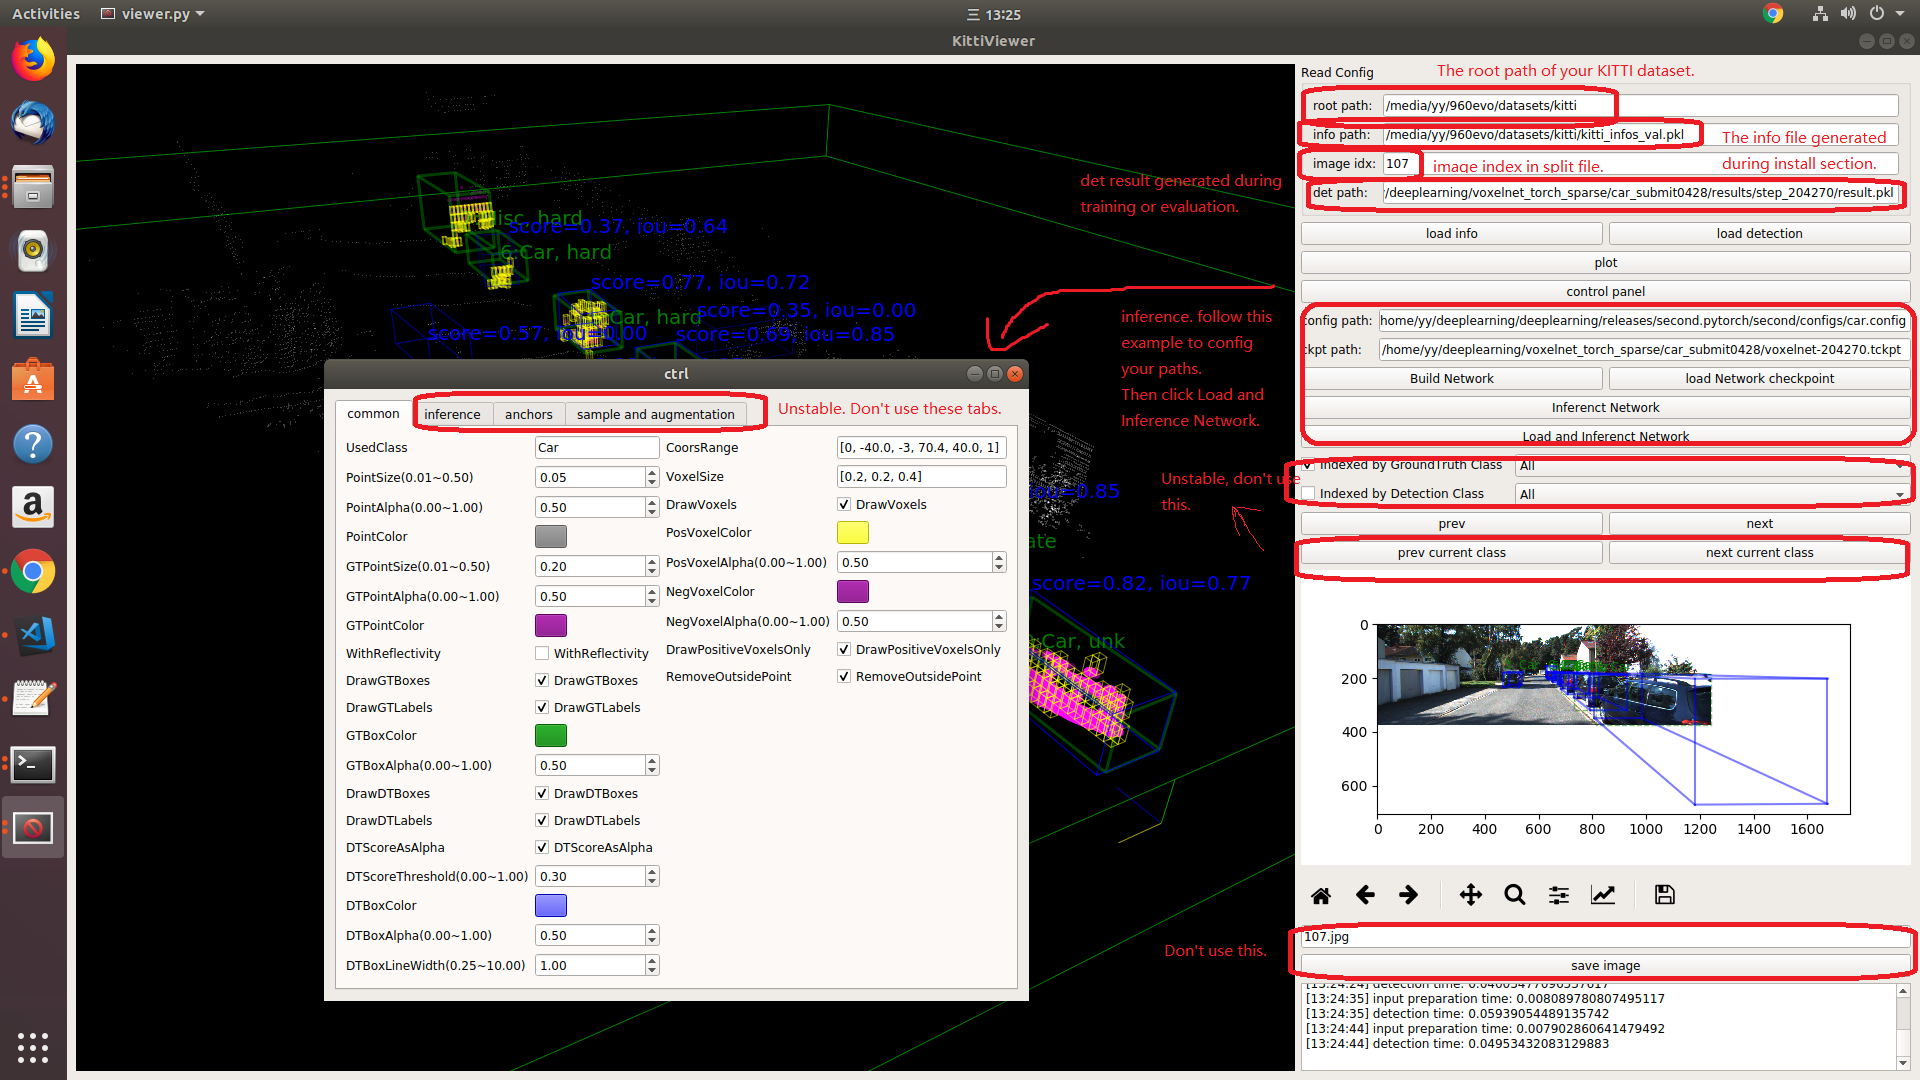
You should use kitti viewer based on pyqt and pyqtgraph to check data before training.
run python ./kittiviewer/viewer.py, check following picture to use kitti viewer:
A kitti lidar box is consist of 7 elements: [x, y, z, w, l, h, rz], see figure.
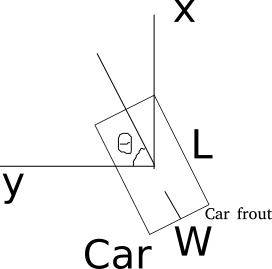
All training and inference code use kitti box format. So we need to convert other format to KITTI format before training.
A kitti camera box is consist of 7 elements: [x, y, z, l, h, w, ry].