
Linux CPU |
Linux GPU |
Mac OS CPU |
Windows CPU |
|---|---|---|---|
 |
|
|
|
Free and open source face detection and recognition with deep learning. Based on the MTCNN and ResNet Center-Loss
DFace is an open source software for face detection and recognition. All features implemented by the pytorch (the facebook deeplearning framework). With PyTorch, we use a technique called reverse-mode auto-differentiation, which allows developer to change the way your network behaves arbitrarily with zero lag or overhead. DFace inherit these advanced characteristic, that make it dynamic and ease code review.
DFace support GPU acceleration with NVIDIA cuda. We highly recommend you use the linux GPU version.It's very fast and extremely realtime.
Our inspiration comes from several research papers on this topic, as well as current and past work such as Joint Face Detection and Alignment using Multi-task Cascaded Convolutional Networks and face recognition topic FaceNet: A Unified Embedding for Face Recognition and Clustering
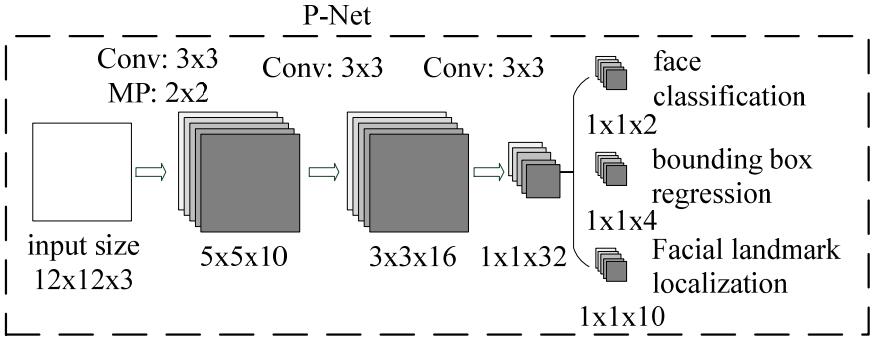
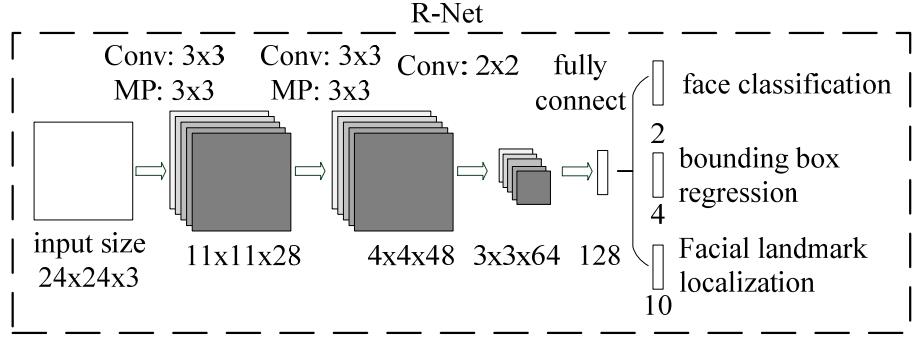
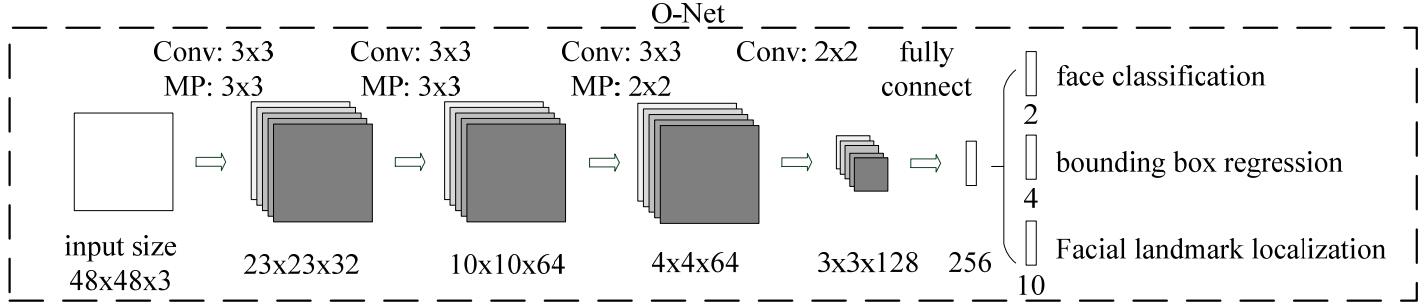
MTCNN Structure
If you want to contribute to DFace, please review the CONTRIBUTING.md in the project.We use Slack for tracking requests and bugs. Also you can following the QQ group 681403076 or my wechat jinkuaikuai005
DFace has two major module, detection and recognition.In these two, We provide all tutorials about how to train a model and running. First setting a pytorch and cv2. We suggest Anaconda to make a virtual and independent python envirment.If you want to train on GPU,please install Nvidia cuda and cudnn.
git clone https://github.com/kuaikuaikim/DFace.gitAlso we provide a anaconda environment dependency list called environment.yml (windows please use environment-win64.yml,Mac environment_osx.yaml) in the root path. You can create your DFace environment very easily.
cd DFace

conda env create -f path/to/environment.yml
Add DFace to your local python path
export PYTHONPATH=$PYTHONPATH:{your local DFace root path}If you are interested in how to train a mtcnn model, you can follow next step.
MTCNN have three networks called PNet, RNet and ONet.So we should train it on three stage, and each stage depend on previous network which will generate train data to feed current train net, also propel the minimum loss between two networks. Please download the train face datasets before your training. We use WIDER FACE and CelebA .WIDER FACE is used for training face classification and face bounding box, also CelebA is used for face landmarks. The original wider face annotation file is matlab format, you must transform it to text. I have put the transformed annotation text file into anno_store/wider_origin_anno.txt. This file is related to the following parameter called --anno_file.
mkdir {your dface traindata folder}python dface/prepare_data/gen_Pnet_train_data.py --prefix_path {annotation file image prefix path, just your local wider face images folder} --dface_traindata_store {dface train data temporary folder you made before } --anno_file {wider face original combined annotation file, default anno_store/wider_origin_anno.txt}python dface/prepare_data/assemble_pnet_imglist.pypython dface/train_net/train_p_net.pypython dface/prepare_data/gen_Rnet_train_data.py --prefix_path {annotation file image prefix path, just your local wider face images folder} --dface_traindata_store {dface train data temporary folder you made before } --anno_file {wider face original combined annotation file, default anno_store/wider_origin_anno.txt} --pmodel_file {your PNet model file trained before}python dface/prepare_data/assemble_rnet_imglist.pypython dface/train_net/train_r_net.pypython dface/prepare_data/gen_Onet_train_data.py --prefix_path {annotation file image prefix path, just your local wider face images folder} --dface_traindata_store {dface train data temporary folder you made before } --anno_file {wider face original combined annotation file, default anno_store/wider_origin_anno.txt} --pmodel_file {your PNet model file trained before} --rmodel_file {your RNet model file trained before}python dface/prepare_data/gen_landmark_48.pypython dface/prepare_data/assemble_onet_imglist.pypython dface/train_net/train_o_net.pyIf you don't want to train,i have put onet_epoch.pt,pnet_epoch.pt,rnet_epoch.pt in model_store folder.You just try test_image.py
python test_image.pyTODO


