A tunable implementation of U-Net in PyTorch.
U-Net is a powerful encoder-decoder CNN architecture for semantic segmentation, developed by Olaf Ronneberger, Philipp Fischer and Thomas Brox. It has won several competitions, for example the ISBI Cell Tracking Challenge 2015 or the Kaggle Data Science Bowl 2018.
An example image from the Kaggle Data Science Bowl 2018:


This repository was created to
In essence, the U-Net is built up using encoder and decoder blocks, each of them consisting of convolutional
and pooling layers. With this implementation, you can build your U-Net using the First, Encoder, Center,
Decoder and Last blocks, controlling the complexity and the number of these blocks.
(Because the first, last and the middle of these blocks are somewhat special, they require their own class.)
WARNING! The 3D U-Net implementation is currently untested!
The simplest way to use the implemented U-Net is with the provided train.py and predict.py scripts.
For training, train.py should be used, where the required arguments are
--train_dataset: path to the training dataset which should be structured like
images_folder
|-- images
   |-- img001.png
   |-- img002.png
   |-- ...
|-- masks
   |-- img001.png
   |-- img002.png
|-- ...--checkpoint_path: path to the folder where you wish to save the results (the trained model, predictions
for images in the validation set and log of losses and metrics during training).Optional arguments:
--val_dataset: path to the validation dataset, having the same structure as the training
dataset indicated above. Defaults to None.--device: the device where you wish to perform training and inference. Possible values are 'cpu',
'cuda:0', 'cuda:1', etc. Defaults for 'cpu'.--in_channels: the number of channels in your images. Defaults to 3.--out_channels: the number of classes in your image. Defaults to 2.--depth: controls the depth of the network. Defaults to 5. (For detailed explanation, see
Customizing the network.)--width: the complexity of each block. More width = more filters learned per layer. Defaults to 32. (For detailed explanation, see
Customizing the network.)--epochs: number of epochs during training. Defaults to 100.--batch_size: the size of the minibatch during each training loop. Defaults to 1. You should tune this to
completely fill the memory of your GPU.--save_freq: the frequency of saving the model and predictions. Defaults to 0, which results in not saving
the model at all, only the logs.--save_model: 1 if you want to save the model at every save_freq epochs and 0 if you dont. Defaults to 0. --model_name: name of the model. Defaults to model. (Useful for parameter tuning.)--learning_rate: the learning rate for training. Defaults to 1e-3.--crop: integer describing the size of random crops taken from training and validation images.
Defaults to None, which results in no cropping. For example, if set to 256, the model is trained and
valdiated on (256, 256) sized random crops. For prediction, the predict.py script should be used, where the required arguments are
--dataset: path to the dataset for which you would like to save the predictions.--results_path: path to the folder where you wish to save the images.--model_path: path to the saved model which you would like to use for inference.
Optional arguments:--device: the device where you wish to perform training and inference. Possible values are 'cpu',
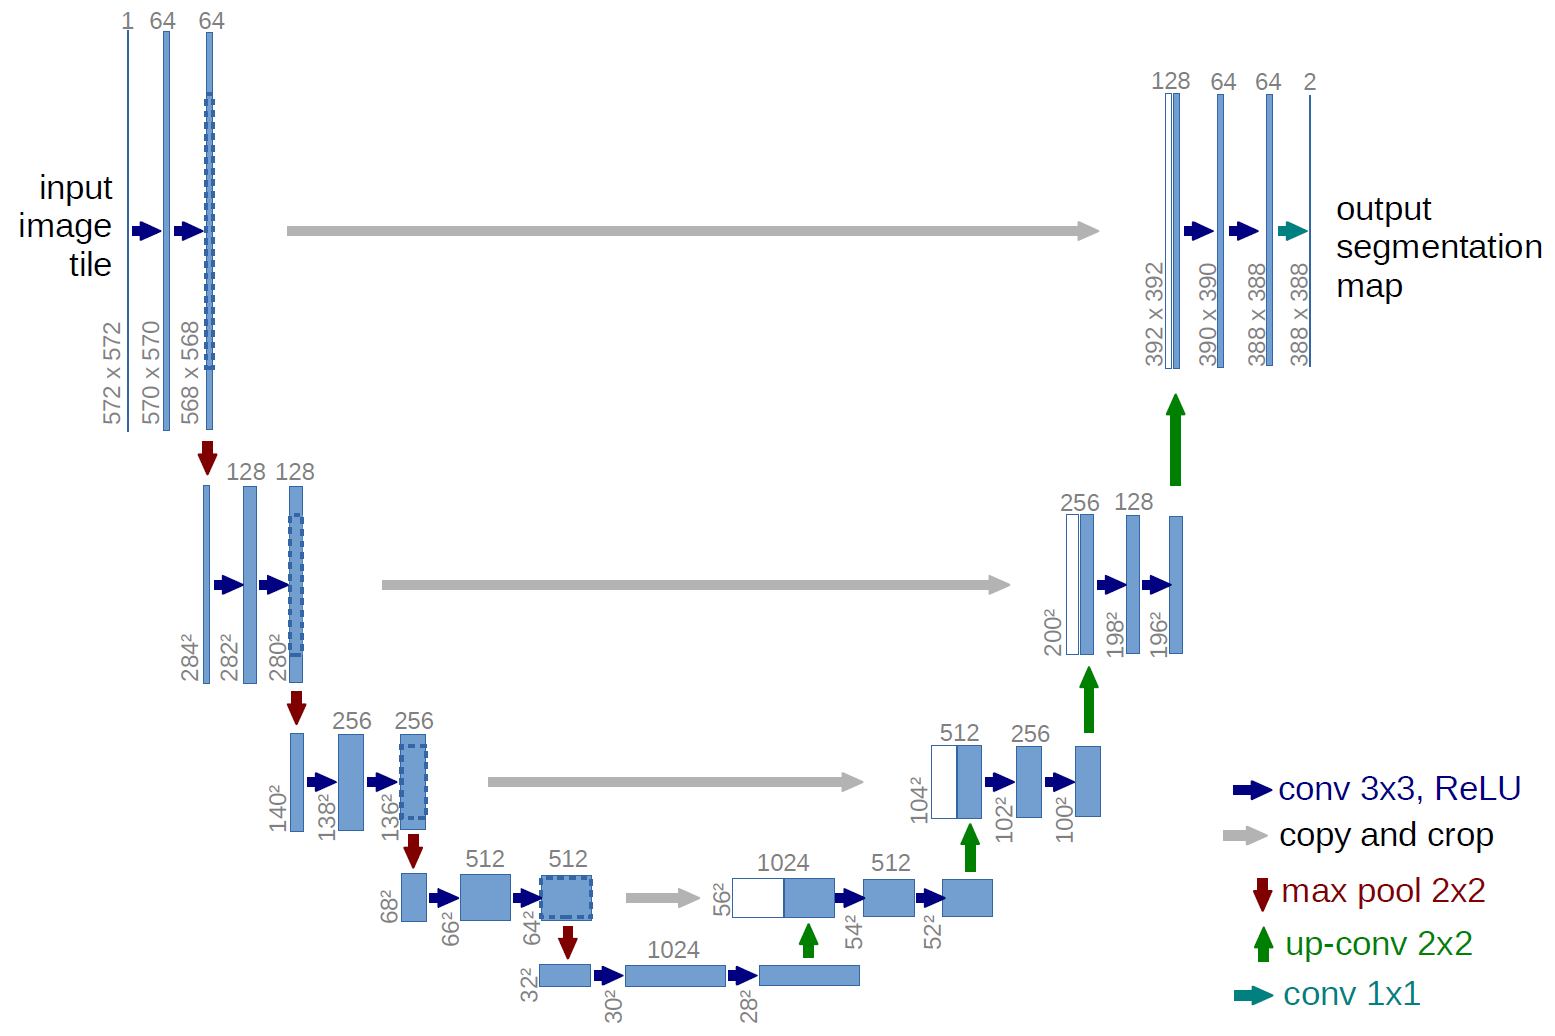
'cuda:0', 'cuda:1', etc. Defaults for 'cpu'.As you can see on this figure, the U-Net architecture is basically made from convolution blocks. In the original architecture, the flow looks like
1 → 64 → 128 → 256 → 512 → 1024 (channels)
1024 → 512 → 256 → 128 → 64 → 1 (channels).
This is quite arbitrary and it might not be the best architecture for your problem. With the implementation provided in this repository, this can be changed quickly without requiring you to tweak the code, as you'll see in the next section.
The 2D U-Net architecture is implemented by the unet.unet.UNet2D
class. It accepts the following arguments during initialization:
in_channels: the number of channels in your images. (Required)out_channels: the number of classes in your images. (Required)conv_depths: a list describing the number of filters learned by the consecutive convolutional blocks.
For example, the original architecture outlined above can be described as [64, 128, 256, 512, 1024].
The argument defaults to this structure.To save time with writing the usual boilerplate PyTorch code for training, a dataset generator and a simple wrapper is provided.
The wrapper is implemented in the unet.model.Model object. Upon initialization, you are required to
provide the following arguments:
net: PyTorch model.loss: loss function which you would like to use during training.optimizer: optimizer for the training.checkpoint_folder: folder for saving the results and predictions.Optional arguments are:
scheduler: learning rate scheduler for the optimizer.device: The device on which the model and tensor should be located. The default device is the cpu.To train the model, the .fit_dataset() method can be used. For details on how to use it, see its docstring.
To do this, you'll need to use the unet.dataset.ImageToImage2D dataset generator, which is described in the
next section.
For training the U-Net, simple classes for augmentations and dataset input is implemented. The joint
augmentation transform for image and mask is implemented in unet.dataset.JointTransform2D. This transform is
used by the unet.dataset.ImageToImage2D. For more details on their usage, see their corresponding docstrings.
To get a good grip on U-Net and how it depends on hyperparameters, I have made a simple experiment using the dataset from the Kaggle Data Science Bowl 2018, which aims to find cell nuclei in microscopy images. Although the goal of the competition was instance based segmentation which is not exactly the proper use of U-Net, it actually won the race with some really clever tricks. (For details, see this post by the winner team, explaining what they did in detail.)
For simplicity, the following experiments are focused on a simplified problem: segmenting out nuclei from the background, disregarding the differences between instances of nuclei.
If you would like to play around with the data, you can
download the images from here. Since the ground truth
masks are given for each instance, we need some preprocessing. This can be done with the provided script
kaggle_dsb18_preprocessing.py, in the kaggle_dsb18 folder. It requires two arguments:
--dataset_path: path to the downloaded dataset.--export_path: path to the folder where you wish to save the results.The images in this dataset can be subdivided further: fluorescent images, brightfield images and histopathological
images containing tissue. If you also want to make this split, you can find the corresponding image names
in the kaggle_dsb18 folder.