


Homebridge plugin for Microsoft game Consoles. Tested with Xbox One X/S and Xbox Series X.
| Package | Installation | Role | Required |
|---|---|---|---|
| Homebridge | Homebridge Wiki | HomeKit Bridge | Required |
| Config UI X | Config UI X Wiki | Web User Interface | Recommended |
| Xbox TV | npm install -g homebridge-xbox-tv |
Plug-In | Required |
xboxLiveId need to be set again../homebridge/persist.AccessoryInfo.xxx file which contain Your device data: {"displayName":"Xbox"}.IdentifierCashe.xxx file with same name as AccessoryInfo.xxx.webApiControl enabled.Speaker Service.lightbulb/fan (slider).webApiControl is enabled and console is authorized.
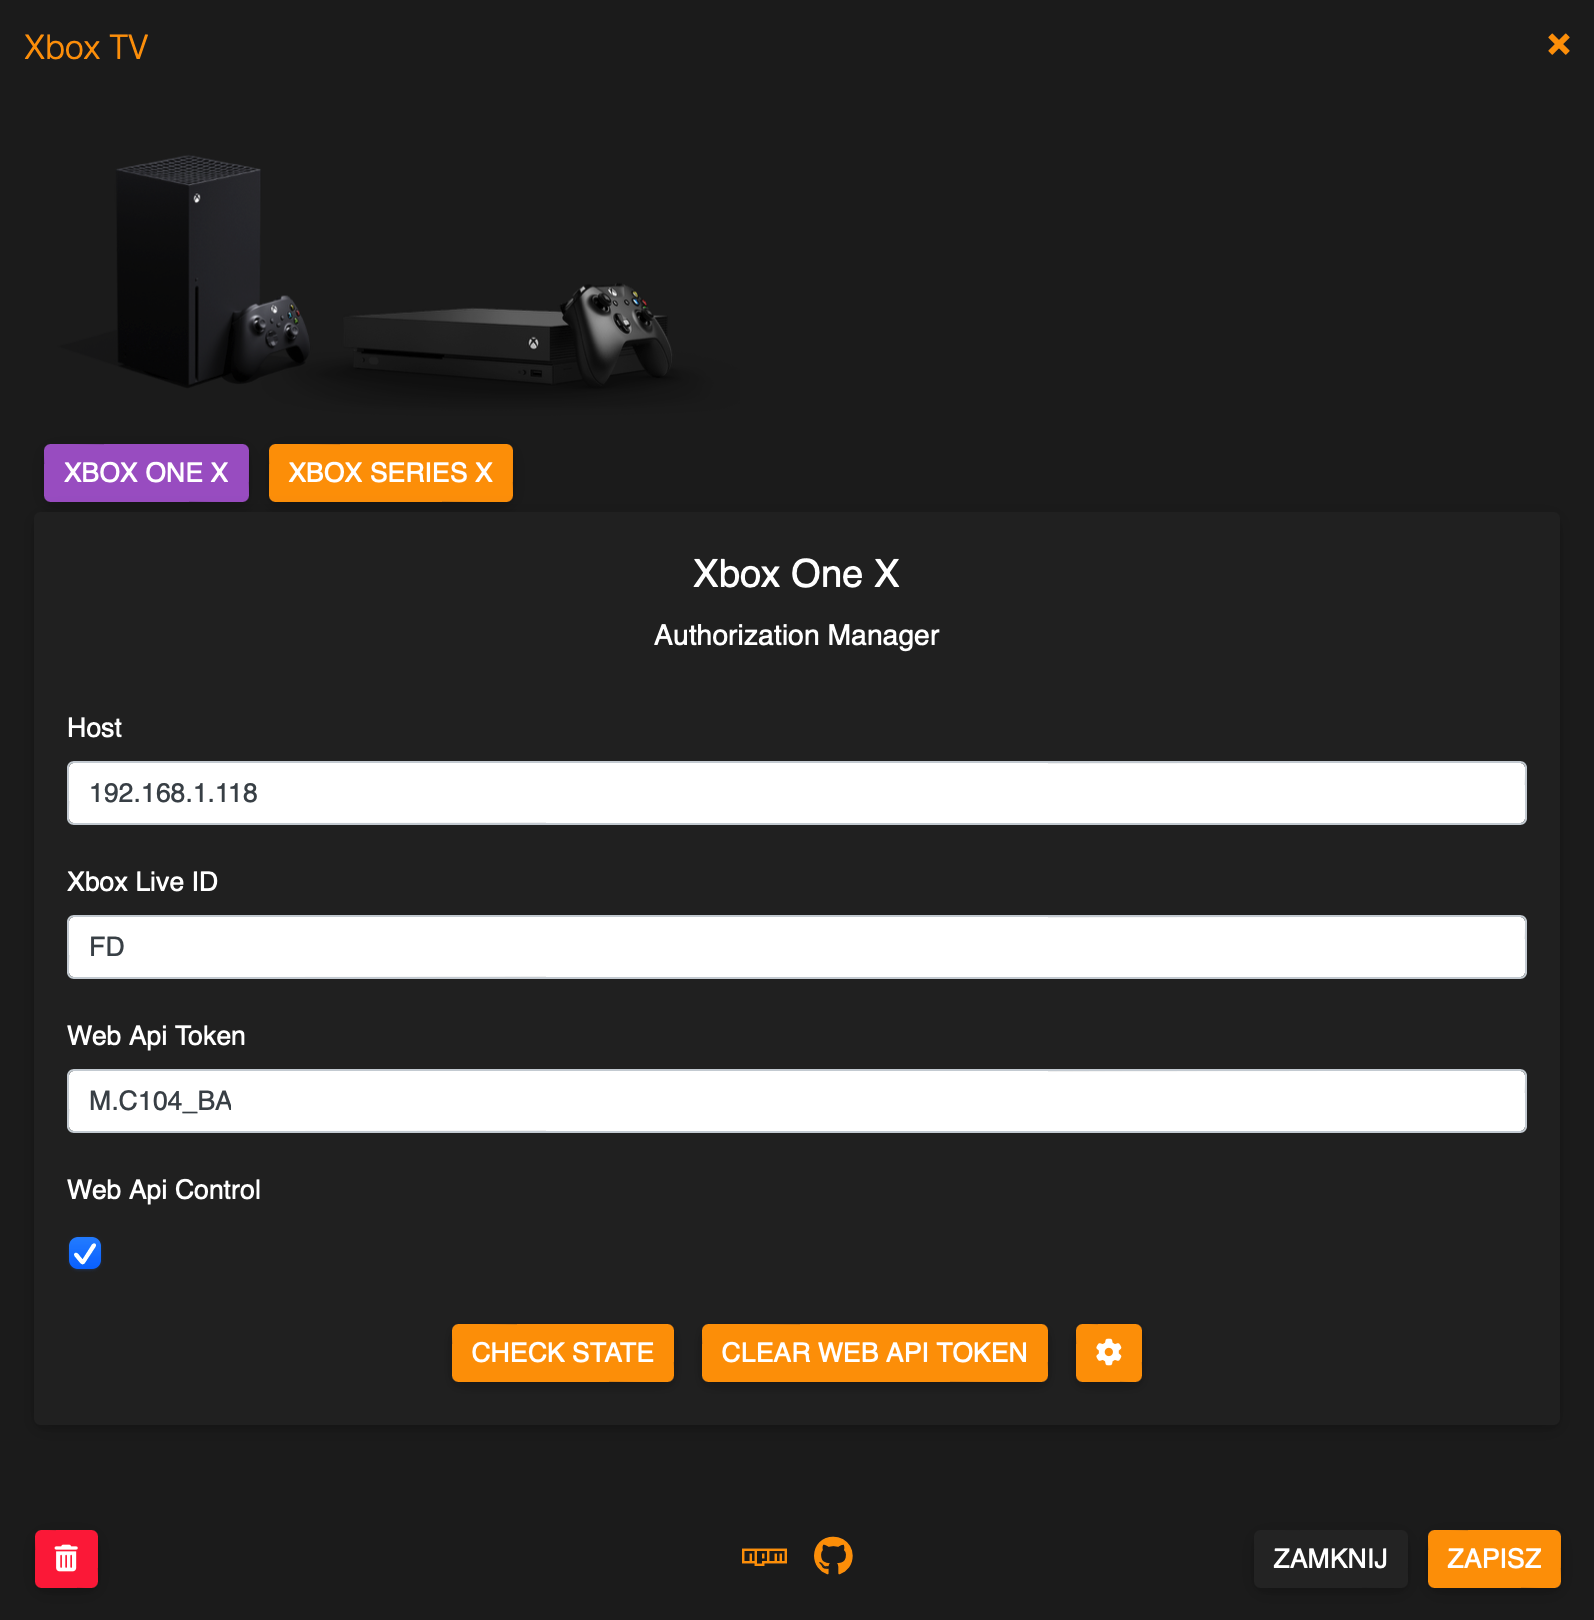
webApiControl option, restart the plugin and go to Homebridge console log.Install and use Homebridge Config UI X plugin to configure this plugin (Highly Recommended). The sample configuration can be edited and used manually as an alternative. See the sample-config.json file in this repository for an example or copy the example below into your config.json file, making the apporpriate changes before saving it. Be sure to always make a backup copy of your config.json file before making any changes to it.

| Key | Description |
|---|---|
name |
Here set the accessory Name to be displayed in Homebridge/HomeKit. |
host |
Here set the Hsostname or Address IP of Console. |
xboxLiveId |
On your console select Profile > Settings > System > Console info, listed as Xbox network device ID. You can only find the Xbox network device ID in Settings on your console, this is different from your console serial number. |
clientId |
If You create app on Azure AD then You can use your own Client Id. |
clientSecret |
If You create app on Azure AD then You can use own Client Secret. |
userToken |
Alternate authorization method. |
userUhs |
Alternate authorization method. |
webApiControl |
If enabled, the console can be controlled using Web Api and additional functions are available in Advanced Settings section. |
xboxWebApiToken |
Required if webApiControl enabled. |
disableLogInfo |
If enabled, disable log info, all values and state will not be displayed in Homebridge log console. |
disableLogDeviceInfo |
If enabled, add ability to disable log device info by every connections device to the network. |
enableDebugMode |
If enabled, deep log will be present in homebridge console. |
volumeControl |
Here select what a additional volume control mode You want to use (None, Slider, Fan), not yet implemented. |
infoButtonCommand |
Here select the function of I button in RC app. |
getInputsFromDevice |
If enabled, apps will be loaded from device, only available if webApiControl enabled. |
filterGames |
If enabled, Games will be hidden and not displayed in the inputs list, only available if webApiControl enabled. |
filterApps |
If enabled, Apps will be hidden and not displayed in the inputs list, only available if webApiControl enabled. |
filterSystemApps |
If enabled, System Apps (Accessory, Microsoft Store, Television) will be hidden and not displayed in the inputs list, only available if webApiControl enabled. |
filterDlc |
If enabled, Dlc will be hidden and not displayed in the inputs list, only available if webApiControl enabled. |
inputs.name |
Here set Input Name which You want expose to the Homebridge/HomeKit, Screensaver, Television, TV Settings, Dashboard, Accessory, Settings, Network Troubleshooter, Microsoft Store are created by default. |
inputs.reference |
Required to identify current running app. |
inputs.oneStoreProductId |
Required to switch apps. |
inputs.type |
Here select from available types. |
buttons.name |
Here set Button Name which You want expose to the Homebridge/HomeKit. |
buttons.command |
Here select button control mode or command, Reboot and Switch App/Game- only possible if webApiControl enabled. |
buttons.oneStoreProductId |
Here set Input oneStoreProductId, only possible if webApiControl enabled. |
buttons.displayType |
Here select display type in HomeKit app, possible Switch, Button - selectable in HomeKit app as Light, Fan, Outlet. |
enableMqtt |
If enabled, MQTT Broker will start automatically and publish all awailable PV installation data. |
mqttHost |
Here set the IP Address or Hostname for MQTT Broker.) |
mqttPort |
Here set the Port for MQTT Broker, default 1883.) |
mqttPrefix |
Here set the Prefix for Topic or leave empty.) |
mqttAuth |
If enabled, MQTT Broker will use authorization credentials. |
mqttUser |
Here set the MQTT Broker user. |
mqttPasswd |
Here set the MQTT Broker password. |
mqttDebug |
If enabled, deep log will be present in homebridge console for MQTT. |
reference, oneStoreProductId |
If web Api enabled then all available in ./homebridge/xboxTv/inputs_xxxxxx file. |
*Example Config:
{
    "platform": "XboxTv",
    "devices": [
        {
            "name": "Xbox One",
            "host": "192.168.1.6",
            "xboxLiveId": "FD0000000000",
            "clientId": "",
            "clientSecret": "",
            "userToken": "",
            "userUhs": "",
            "xboxWebApiToken": "",
            "webApiControl": false,
            "disableLogInfo": false,
            "disableLogDeviceInfo": false,
            "enableDebugMode": false,
            "volumeControl": 0,
            "infoButtonCommand": "nexus",
            "getInputsFromDevice": false,
            "filterGames": false,
            "filterApps": false,
            "filterSystemApps": false,
            "filterDlc": false,
            "inputs": [
                        {
                            "name": "A Way Out",
                            "reference": "AWayOut_zwks512sysnyr!AppAWayOut",
                            "oneStoreProductId": "",
                            "type": "APPLICATION"
                        },
                        {
                            "name": "Apple TV",
                            "reference": "AppleInc.AppleTV_nzyj5cx40ttqa!App",
                            "oneStoreProductId": "",
                            "type": "APPLICATION"
                        }
                    ],
            "buttons": [
                        {
                            "name": "Play",
                            "command": "play",
                            "displayType": 0,
                        },
                        {
                            "name": "Record Game DVR",
                            "command": "recordGameDvr",
                            "displayType": 0
                        },
                        {
                            "name": "Reboot",
                            "command": "reboot",
                            "displayType": 0
                        },
                        {
                            "name": "A Way Out",
                            "command": "switchAppGame",
                            "oneStoreProductId": "oneStoreProductId",
                            "displayType": 0
                        },
                    ],
            "enableMqtt": false,
            "mqttHost": "192.168.1.33",
            "mqttPort": 1883,
            "mqttPrefix": "home/xbox",
            "mqttAuth": false,
            "mqttUser": "user",
            "mqttPass": "password",
             "mqttDebug": false
        }
    ]
}Each accessory needs to be manually paired.
 app on your device.
  .
.