Example showing how to integrate Dropwizard, Spring DI, Spring Security together. They are compiled into a single uber-jar using the Gradle Shadow plugin: https://github.com/johnrengelman/shadow.
We used the OneJar plugin before (hence it is in the title of this example), but it caused issues with Dropwizard's HTML asset loading mechanism, so we replaced it with the Gradle Shadow plugin.
It also shows how to perform integration testing of a REST application using the famous BDD tool Cucumber:
This application was prepared for a Houston JUG presentation:
Note
This application uses Lombok: http://projectlombok.org/
Please make sure you have the appropriate Lombok plugin installed in your IDE.
Gradle Wrapper 1.7 is used for compatibility with the RPM plugin
Regenerate IDEA IntelliJ bindings
Regenerate Eclipse bindings
Runs the app main() method
Compiles the entire app together with its dependencies into one single uber-JAR, using the Gradle Shadow plugin
Compiles and runs the Gradle Shadow uber-JAR version of the app
Runs the uber-JAR on a separate thread and executes the entire BDD test suite against the running application.
Mock frameworks are the false prophets of Java application testing.
Your only surefire way to test your logic is to fire requests at your fully running app and verify its behaviour and responses. Cucumber-style BDDs are the best and most productive way to accomplish this task IMHO:
To get it fully running and installed do the following:
Ubuntu / Debian
sudo apt-get install ruby ruby-dev libyaml-dev
sudo gem install bundler
bundle install
Fedora
sudo yum install ruby ruby-devel libyaml-devel
gem install bundler
bundle install
CentOS / RHEL
RHEL and its derivates feature an old version of Ruby (1.8), where the standard HTTP library does not have support for the HTTP PATCH command. Hence, it is necessary to install Ruby 1.9 from source on that distribution:
The rest is the same afterwards
gem install bundler
bundle install
Windows
Install Ruby 1.9 (NOT 2.0) for Windows: http://rubyinstaller.org/
and the Ruby 1.9 DevKit as well: http://rubyinstaller.org/add-ons/devkit/
Install the Ruby dev kit (from the folder where you placed it):
ruby dk.rb init
ruby dk.rb install
Go back to the folder where you checked out this source code and do:
gem install bundler
bundle installRun the app from your IDE.
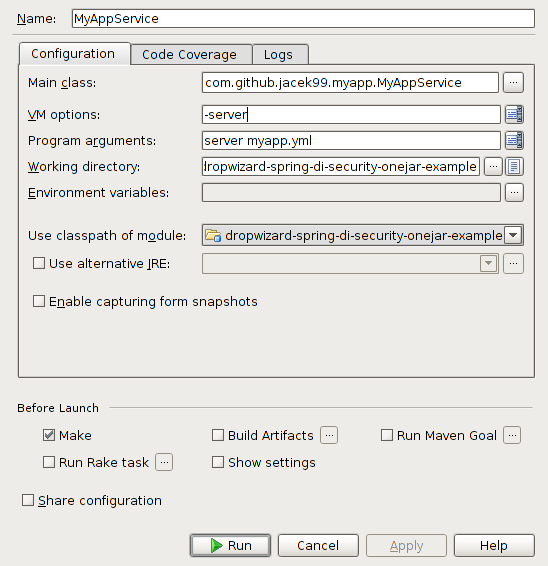
You will need to create a launcher that passes in the server myapp.yml program arguments to the main class MyAppService, as seen in the image below:
https://raw.github.com/jacek99/dropwizard-spring-di-security-onejar-example/master/launcher.png
Go to a terminal and do
cd src/test/resources/bdd
cucumber
and you should see a human-readable BDD execute:
One of the greatest aspects of Dropwizard and Gradle Shadow is that it is very easy to wrap your application in a native Linux package such as a .deb or a .rpm file.
This allows to set up as a Linux daemon, use respawn capabilities (lets the OS restart your app automatically in case of a crash), and natively install/uninstall using the OS's built-in packaging capabilities.
If you are using tools such as Puppet or Chef for DevOps, having your app delivered in a native Linux package makes it trivial for them to roll it out across a large number of servers in a datacenter.
Create a native .deb file (in build/distributions)
You can then install the .deb:
sudo dpkg -i build/distributions/myapp-1.1.deb

Selecting previously unselected package myapp.
(Reading database ... 370503 files and directories currently installed.)
Unpacking myapp (from .../distributions/myapp-1.1.deb) ...
Setting up myapp (1.1) ...
Installing new version of config file /etc/myapp.yml ...
Processing triggers for ureadahead ...
Run it as a service:
sudo start myapp

myapp start/running, process 20141

ps -ef | grep myapp
root     20141     1 46 12:57 ?        00:00:04 /usr/lib/jvm/java-1.7.0-openjdk-amd64/bin/java -Xms512m -Xmx512m -jar -server myapp-shadow.jar server /etc/myapp.yml
Kill it and verify Linux restarted it automatically:
sudo kill -9 20141

ps -ef | grep myapp
root     20184     1 99 12:57 ?        00:00:02 /usr/lib/jvm/java-1.7.0-openjdk-amd64/bin/java -Xms512m -Xmx512m -jar -server myapp-shadow.jar server /etc/myapp.yml
Uninstall it and verify the service got stopped automatically (look for the "Stopping MyApp..." message):
sudo apt-get remove myapp

Reading package lists... Done
Building dependency tree
Reading state information... Done
The following packages will be REMOVED:
  myapp
0 upgraded, 0 newly installed, 1 to remove and 2 not upgraded.
After this operation, 0 B of additional disk space will be used.
Do you want to continue [Y/n]? y
(Reading database ... 370503 files and directories currently installed.)
Removing myapp ...
Stopping MyApp...
myapp stop/waiting
Processing triggers for ureadahead ...
In the sample above, we are running the service as root, which is not recommended. You can change the default user by modifying the contents of the /etc/init/myapp.conf file:
# change this user if required
# setuid rootNote: You can create .deb files on CentOS / Fedora as well. You just need to have the dpkg package installed:
sudo yum install dpkgand the gradle deb task will execute successfully on those flavors of Linux as well. You can obviously install the actual .deb on Debian systems only though.
Create a native .rpm file (in build/distributions). It includes daemon config files for both CentOS upstart (which is fairly outdated by now) or the latest Fedora systemd init system (which is the long term replacement for init.d and upstart).
Assuming you are installing this on a recent Fedora box, you can then install the .rpm:
sudo yum localinstall build/distributions/myapp-1.1-20130921145949.noarch.rpm

Loaded plugins: etckeeper, fastestmirror, langpacks, priorities, refresh-packagekit, refresh-updatesd, versionlock
Examining build/distributions/myapp-1.1-20130921145949.noarch.rpm: myapp-1.1-20130921145949.noarch
Marking build/distributions/myapp-1.1-20130921145949.noarch.rpm to be installed
Resolving Dependencies
--> Running transaction check
---> Package myapp.noarch 0:1.1-20130921145949 will be installed
--> Finished Dependency Resolution
Running transaction check
Running transaction test
Transaction test succeeded
Running transaction
etckeeper: pre transaction commit
  Installing : myapp-1.1-20130921145949.noarch                                                                                                                              1/1
Initializing MyApp...
etckeeper: post transaction commit
  Verifying  : myapp-1.1-20130921145949.noarch                                                                                                                              1/1

Installed:
  myapp.noarch 0:1.1-20130921145949
Start up the daemon using systemd:
sudo systemctl start myapp

ps -ef | grep myapp
root     27447     1 66 15:04 ?        00:00:03 /usr/lib/jvm/jre-1.7.0/bin/java -jar -server -Xms512m -Xmx512m myapp-shadow.jar server /etc/myapp
Kill it and verify Linux restarts it automatically:
sudo kill -9 27447

ps -ef | grep myapp
root     27578     1 99 15:05 ?        00:00:01 /usr/lib/jvm/jre-1.7.0/bin/java -jar -server -Xms512m -Xmx512m myapp-shadow.jar server /etc/myapp.yml
Uninstall it and verify the service got stopped automatically (look for *'Stopping MyApp...' message):
sudo yum remove myapp -y

Loaded plugins: etckeeper, fastestmirror, langpacks, priorities, refresh-packagekit, refresh-updatesd, versionlock

Resolving Dependencies
--> Running transaction check
---> Package myapp.noarch 0:1.1-20130921145949 will be erased
--> Finished Dependency Resolution
Stopping MyApp...
  Erasing    : myapp-1.1-20130921145949.noarch                                                                                                                              1/1
etckeeper: post transaction commit
  Verifying  : myapp-1.1-20130921145949.noarch                                                                                                                              1/1

Removed:
  myapp.noarch 0:1.1-20130921145949
In the sample above, we are running the service as root, which is not recommended. You can change the default user by modifying the contents of the /etc/systemd/system/myapp.service file:
[Service]
User=rootNote: On CentOS, instead of using systemd, you would just use the same upstart command as on Debian:
sudo start myappand the the app should run as a Linux dameon.
Also, since the Gradle RPM plugin uses the pure Java Redline library, you can build them on any platform that runs Java.