This project adds an easy way to create DIY lighting for Home Assistant, an amazing, extensible, open-source home automation system.
I was frustrated that the built-in MQTT light didn't support transitions (fading between colors/brightnesses), and that it uses multiple separate calls to set the different values (state (on/off), brightness, color), so I decided to make my own version. As of version 0.26, the MQTT JSON light platform has been merged into Home Assistant.
By sending a JSON payload (in an MQTT message), Home Assistant can include whichever fields are necessary, reducing the round trips from 3 to 1. For example, this is a sample payload including most of the fields:
{
  "state": "ON",
  "brightness": 120,
  "color": {
    "r": 255,
    "g": 100,
    "b": 100
  },
  "transition": 5
}To set this system up, you need to configure the MQTT light component in Home Assistant and set up a light to control. This guide assumes that you already have Home Assistant set up and running. If not, see the installation guides here.
In your configuration.yaml, add the following, depending on the supported features of the light:
# Only one color:
light:
  - platform: mqtt
    schema: json
    name: mqtt_json_light_1
    state_topic: "home/json_brightness"
    command_topic: "home/json_brightness/set"
    brightness: true
    effect: true
    effect_list: [flash]
    optimistic: false
    qos: 0

# RGB:
light:
  - platform: mqtt
    schema: json
    name: mqtt_json_light_2
    state_topic: "home/rgb1"
    command_topic: "home/rgb1/set"
    brightness: true
    rgb: true
    effect: true
    effect_list: [colorfade_slow, colorfade_fast, flash]
    optimistic: false
    qos: 0

# RGBW:
light:
  - platform: mqtt
    schema: json
    name: mqtt_json_light_3
    state_topic: "home/rgbw1"
    command_topic: "home/rgbw1/set"
    brightness: true
    rgb: true
    white_value: true
    effect: true
    effect_list: [colorfade_slow, colorfade_fast, flash]
    optimistic: false
qos: 0name, state_topic, and command_topic to values that make sense for you.sudo systemctl restart home-assistant.service (or just restart the Pi).I'm using ESP8266-01 microcontrollers for my lights because they are so cheap and small. The downside of the size and price is that programming them can be a bit of a hassle. There are many sites that go into detail, so I won't do it here. You'll need an ESP set up to work with the Arduino IDE. See the readme here for instructions. Another good device to work with is the Wemos D1 Mini, which has a built-in micro-USB port and is much easier to program.
mqtt_esp8266_light project in the Arduino IDE.config-sample.h file with your settings for LED type, pin numbers, WiFi settings, and MQTT settings.
CONFIG_STRIP option, choose one of BRIGHTNESS, RGB, or RGBW.CONFIG_MQTT_CLIENT_ID setting is a unique value for your network.CONFIG_MQTT_TOPIC_STATE and CONFIG_MQTT_TOPIC_SET to match the values you put in your configuration.yaml.config.h..ino file in the Arduino IDE and upload to an ESP with the correct connections.DEPRECATED FolderOriginally, there were separate Arduino sketches for each of the supported light types. This quickly became redundant and hard-to-maintain, so the new, unified sketch was created.
Please use this (mqtt_esp8266_light) sketch going forward. The deprecated sketches will not receive new features and will be removed from the project in the future.
For an RGB LED strip using N-MOSFETs for control, you'll want to wire it similar to this:
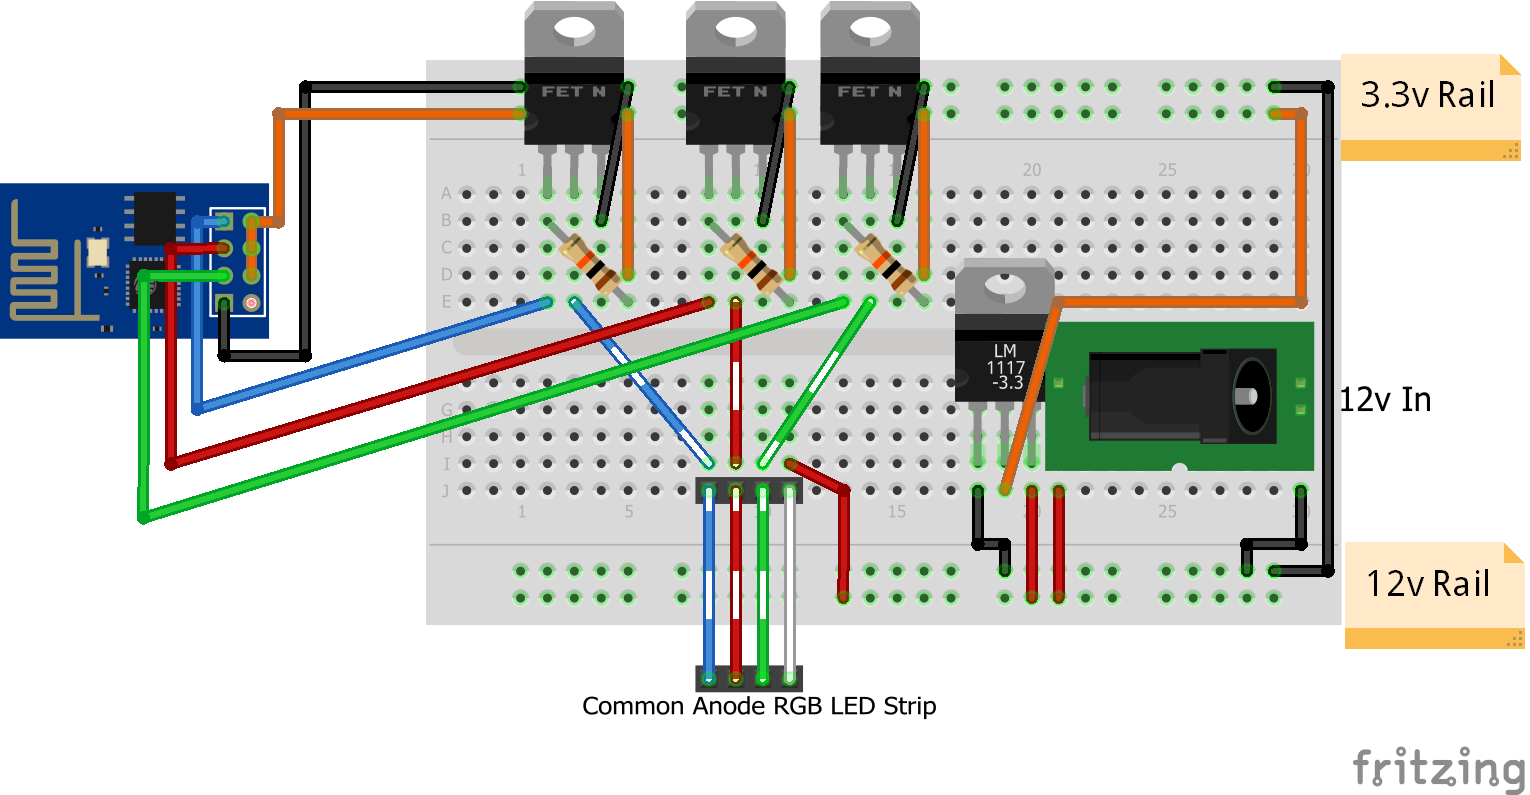
Note that the MOSFETs have pull-up resistors in this setup. This means that the lights may flash on when the module resets, but it was necessary to keep the ESP's pins in the right start state.