Spring Tutorial Index Page
Previous: Hello World
Next: Handling Form Submission
In previous tutorial, we have seen how to create a simple Hello World Spring application using Maven under Eclipse. In the Hello World application, we used annotation. In this tutorial, I will show how to use xml configuration and setter dependency injection. Instead of showing a message in the final view, this time it shows a list of employees.
Step 1: Create Bean and Manager Classes
Employee.java
package com.programcreek.helloworld.model; public class Employee { private String id; private String lastName; private String firstName; public Employee(String id, String lastName, String firstName) { this.id = id; this.lastName = lastName; this.firstName = firstName; } public String getId() { return id; } public void setId(String id) { this.id = id; } public String getLastName() { return lastName; } public void setLastName(String lastName) { this.lastName = lastName; } public String getFirstName() { return firstName; } public void setFirstName(String firstName) { this.firstName = firstName; } } |
EmployeeManager.java
package com.programcreek.helloworld.service; import java.util.ArrayList; import java.util.List; import com.programcreek.helloworld.model.Employee; public class EmployeeManager { private static List<Employee> employeeList; public EmployeeManager(){ employeeList = new ArrayList<Employee>(); employeeList.add(new Employee("1", "Mike", "Smith")); employeeList.add(new Employee("2", "John", "Taylor")); employeeList.add(new Employee("3", "Dave", "Wilson")); } public List<Employee> getEmployeeList(){ return employeeList; } } |
Step 2: Create Controller
EmployeeController.java
package com.programcreek.helloworld.controller; import javax.servlet.http.HttpServletRequest; import javax.servlet.http.HttpServletResponse; import org.springframework.web.servlet.ModelAndView; import org.springframework.web.servlet.mvc.Controller; import com.programcreek.helloworld.service.EmployeeManager; public class EmployeeController implements Controller { private EmployeeManager employeeManager; public EmployeeManager getEmployeeManager() { return employeeManager; } public void setEmployeeManager(EmployeeManager employeeManager) { this.employeeManager = employeeManager; } public ModelAndView handleRequest(HttpServletRequest arg0, HttpServletResponse arg1) throws Exception { System.out.println("in EmployeeController"); ModelAndView mv = new ModelAndView("employeeList"); mv.addObject("employeeList", this.employeeManager.getEmployeeList()); return mv; } } |
Step 3: Create View
Create another view file – employeeList.jsp under the views directory.
<%@ taglib prefix="c" uri="http://java.sun.com/jsp/jstl/core"%> <%@ page language="java" contentType="text/html; charset=ISO-8859-1" pageEncoding="ISO-8859-1"%> <!DOCTYPE html PUBLIC "-//W3C//DTD HTML 4.01 Transitional//EN" "http://www.w3.org/TR/html4/loose.dtd"> <html> <head> <meta http-equiv="Content-Type" content="text/html; charset=ISO-8859-1"> <title>Spring 4 MVC - Employee List</title> </head> <body> <center> <c:forEach items="${employeeList}" var="employee"> ${employee.id}: ${employee.lastName}, ${employee.firstName}<br> </c:forEach> </center> </body> </html> |
c: is from jstl. So I add <%@ taglib prefix="c" uri="http://java.sun.com/jsp/jstl/core"%>. This will give a warning message “Can not find the tag library descriptor for “http://java.sun.com/jsp/jstl/core”. “. To fix the problem, open pom.xml file, and add the dependency by using the following code:
<dependency> <groupId>jstl</groupId> <artifactId>jstl</artifactId> <version>1.2</version> </dependency> |
Change the index.jsp file to the following:
<%@ page language="java" contentType="text/html; charset=ISO-8859-1" pageEncoding="ISO-8859-1"%> <!DOCTYPE html PUBLIC "-//W3C//DTD HTML 4.01 Transitional//EN" "http://www.w3.org/TR/html4/loose.dtd"> <html> <head> <meta http-equiv="Content-Type" content="text/html; charset=ISO-8859-1"> <title>Spring 4 MVC - HelloWorld Index Page</title> </head> <body> <center> <h3> <a href="hello">Hello World</a> </h3> <h3> <a href="employee">Employee List</a> </h3> </center> </body> </html> |
Step 4: Configure XML File
Now we need to configure the dispatcher-servlet.xml file. After changing, it should looks like the following:
<beans xmlns="http://www.springframework.org/schema/beans" xmlns:context="http://www.springframework.org/schema/context" xmlns:xsi="http://www.w3.org/2001/XMLSchema-instance" xsi:schemaLocation=" http://www.springframework.org/schema/beans http://www.springframework.org/schema/beans/spring-beans-3.0.xsd http://www.springframework.org/schema/context http://www.springframework.org/schema/context/spring-context-3.0.xsd"> <context:component-scan base-package="com.programcreek.helloworld.controller" /> <bean id="employeeManager" class="com.programcreek.helloworld.service.EmployeeManager" /> <bean name="/employee" class="com.programcreek.helloworld.controller.EmployeeController"> <property name="employeeManager" ref="employeeManager"/> </bean> <bean class="org.springframework.web.servlet.view.InternalResourceViewResolver"> <property name="prefix"> <value>/WEB-INF/views/</value> </property> <property name="suffix"> <value>.jsp</value> </property> </bean> </beans> |
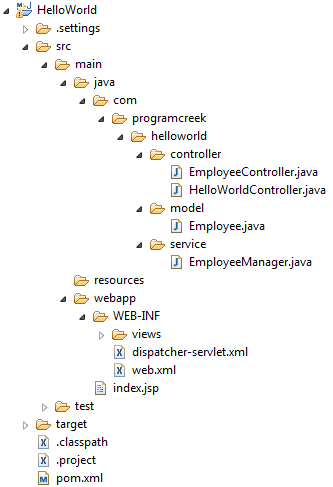
Final Result
Final Navigator view looks like the following:

Running the project, we will get the views.


dependency injection is not used in this tutorial. you define the bean “employeeManager” in dispatcher-servlet.xml file but you didn’t used in the controller in the handleRequest method.
Part one of this tutorial worked well, but this part two always gives me error, when I run it:
SEVERE: Unable to deploy collapsed ear in war StandardEngine[Catalina].StandardHost[localhost].StandardContext[/helloworld]
org.apache.openejb.OpenEJBException: Unable to load servlet class: org.springframework.web.servlet.DispatcherServlet: org.springframework.web.servlet.DispatcherServlet
at org.apache.openejb.config.AnnotationDeployer$ProcessAnnotatedBeans.deploy(AnnotationDeployer.java:2113)
at org.apache.openejb.config.AnnotationDeployer$ProcessAnnotatedBeans.deploy(AnnotationDeployer.java:1843)
at org.apache.openejb.config.AnnotationDeployer.deploy(AnnotationDeployer.java:360)
at org.apache.openejb.config.ConfigurationFactory$Chain.deploy(ConfigurationFactory.java:403)
(Etc, etc)
Using Os X 10.10.5, Eclipse Mars.1, TomEE plus 1.7.2 and maven 3.3.3. Also, same problem with Linuxmint 17.2 and same versions. In Eclipse I get Maven Java EE configuration problems: “An error occurred while filtering resources”, “Cannot change version of project facet Dynamic Web Module to 3.0.”, “Cannot change version of project facet Dynamic Web Module to 3.0.”, “JavaServer Faces 2.1 requires Dynamic Web Module 2.5 or newer.” and “One or more constraints have not been satisfied.” in Markers view
if you are using maven to crate war, you need to add to pom.xml:
javax.servlet
servlet-api
2.5
Great tutorial, by the way… Maybe some more explanations, this is my first time to see mapping in xml like this: <bean name="/employee"…
This is great, thanks!