Let’s say each widget has 4 sides, e.g., a button has top, bottom, left, and right.
All of the following examples assume you know how to create a plug-in application with a view, as the code will work under
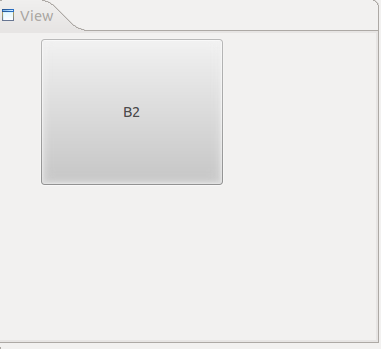
1. Basic usage of FormLayout
The basic usage of FormLayout are as follows:
public void createPartControl(Composite parent) { //create a FormLayout and set its margin FormLayout layout = new FormLayout(); layout.marginHeight = 5; layout.marginWidth = 5; //set layout for parent parent.setLayout(layout); //create a button or any other widget Button button2 = new Button(parent, SWT.PUSH); button2.setText("B2"); //create FormData and set each of its sides FormData formData = new FormData(); formData.top = new FormAttachment(0, 0); formData.bottom = new FormAttachment(50, 0); formData.left = new FormAttachment(10, 0); formData.right = new FormAttachment(60, 0); //set FormDate for button button2.setLayoutData(formData); } |
As the example above shown, we will need to create several
For example, the following will set the widget’s top position to be 10% of heights – 5 pixels.
formData.top = new FormAttachment (10, -5); |
The most interesting feature about FormAttachment is that it can set position based on another widget. In that case, “x” is another widget.
For example, the following code set the widget’s left position to be another widget, i.e., button1’s right position + 5 pixels.
formData.left = new FormAttachment (button1, 5); |
The button in the example above will have the following look:
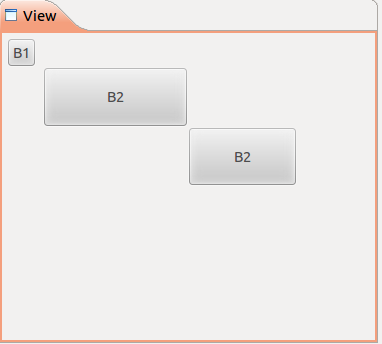
2. Attach to other widgets
The following example contains 3 buttons which use
public void createPartControl(Composite parent) { // create a FormLayout and set its margin FormLayout layout = new FormLayout(); layout.marginHeight = 5; layout.marginWidth = 5; // set layout for parent parent.setLayout(layout); Button button1 = new Button(parent, SWT.PUSH); button1.setText("B1"); // create a button or any other widget Button button2 = new Button(parent, SWT.PUSH); button2.setText("B2"); // create FormData and set each of its sides FormData formData = new FormData(); formData.top = new FormAttachment(button1, 0); formData.bottom = new FormAttachment(30, 0); formData.left = new FormAttachment(10, 0); formData.right = new FormAttachment(50, 0); // set FormDate for button button2.setLayoutData(formData); // create a button or any other widget Button button3 = new Button(parent, SWT.PUSH); button3.setText("B2"); // create FormData and set each of its sides FormData formData2 = new FormData(); formData2.top = new FormAttachment(button2, 0); formData2.bottom = new FormAttachment(50, 0); formData2.left = new FormAttachment(button2, 0); formData2.right = new FormAttachment(80, 0); // set FormDate for button button3.setLayoutData(formData2); } |
The three buttons can be easily to be set chained with relative position to widget in the same composite.